Mini No-Bake Fruit Tartlets – Simple, Fresh, and Perfect for Any Occasion
These mini no-bake fruit tartlets are a quick win when you want something pretty, fresh, and fuss-free. No oven, no fancy tools, just a few simple ingredients and a chill in the fridge. They’re great for parties, brunch, or a light dessert after dinner.
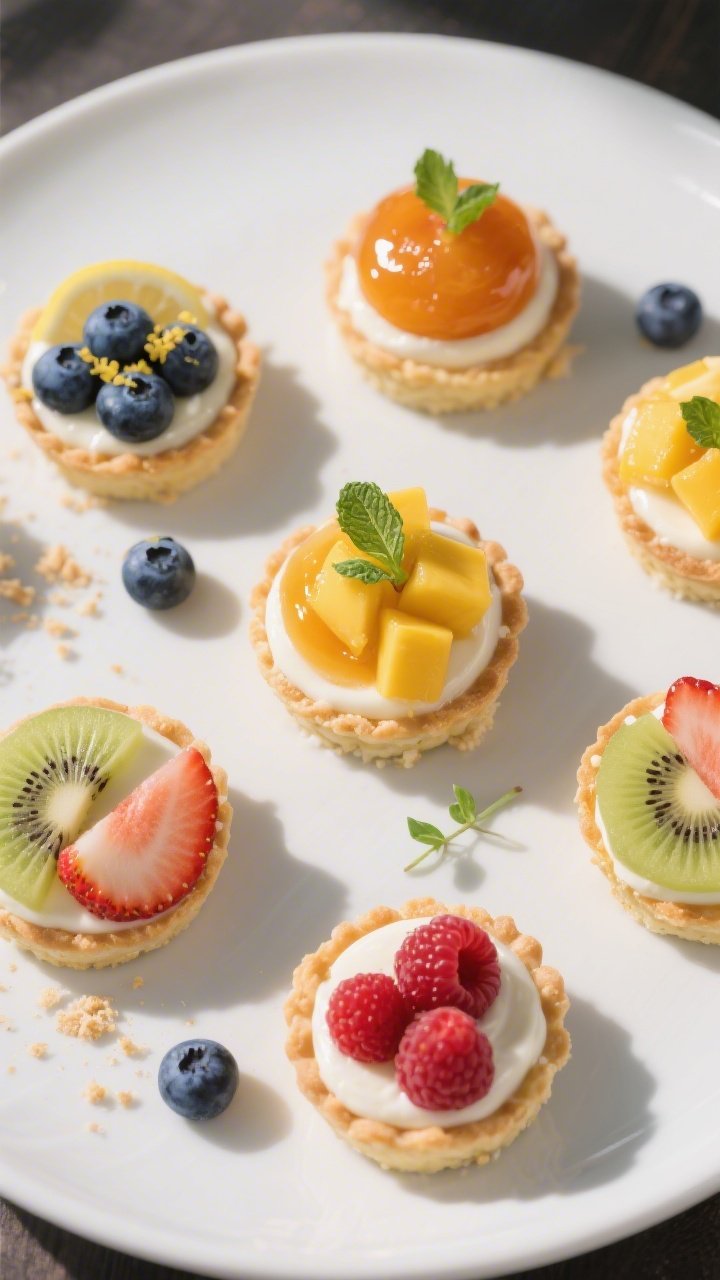
You get a creamy, tangy filling, a crunchy crust, and juicy fruit on top in every bite. They look impressive, but they’re easy enough for a weekday treat.
Mini No-Bake Fruit Tartlets - Simple, Fresh, and Perfect for Any Occasion
Ingredients
Method
- Prep your pans: If using metal mini tart pans, lightly grease them.For a muffin tin, line cups with paper liners for easy removal.
- Make the crust: In a bowl, stir together crumbs, sugar, and salt. Add melted butter and mix until the texture resembles damp sand and clumps when pressed.
- Press and chill: Divide crumbs among pans. Press firmly on the bottom and slightly up the sides using the back of a spoon or a small measuring cup.Chill for 15–20 minutes to set.
- Whip the cream: In a cold bowl, beat the heavy cream to soft peaks. Set aside.
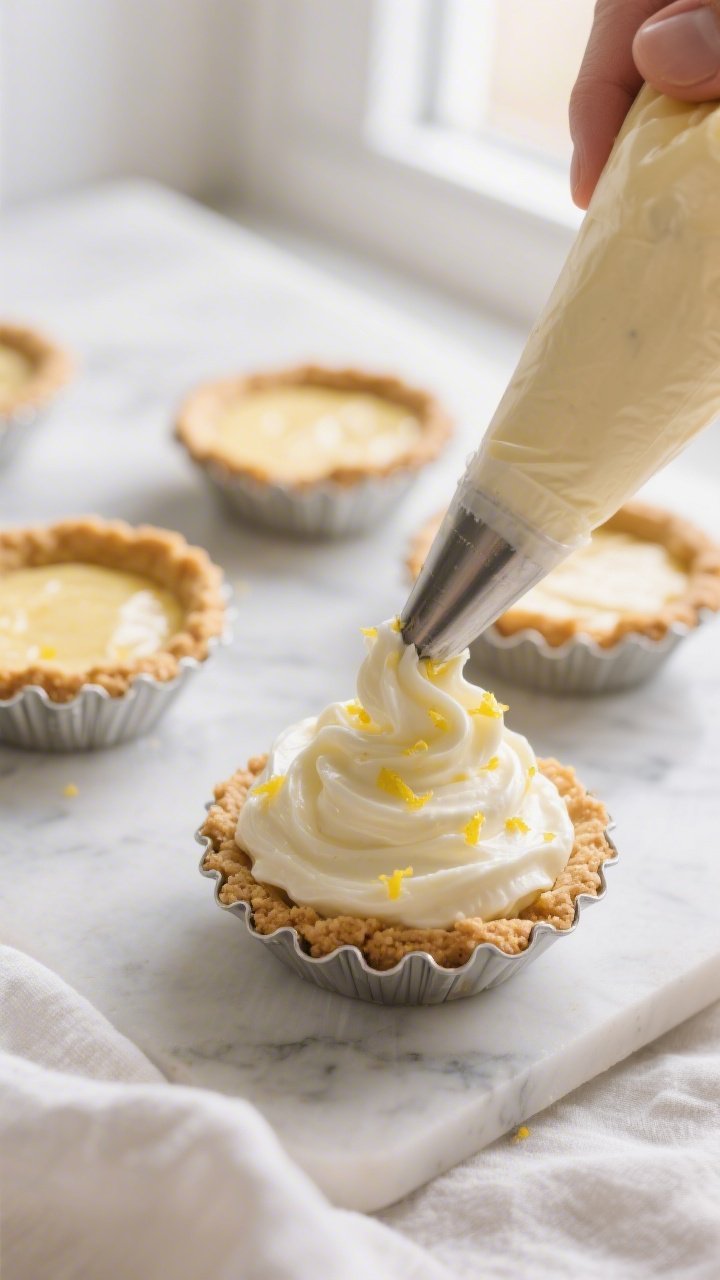
- Mix the cream cheese base: In another bowl, beat cream cheese, powdered sugar, vanilla, lemon zest, lemon juice, and a pinch of salt until smooth and fluffy, 1–2 minutes.
- Fold it together: Gently fold the whipped cream into the cream cheese mixture in two additions until smooth and airy. Do not overmix.
- Fill the tart shells: Spoon or pipe the filling into chilled crusts.Smooth the tops. Chill for at least 1 hour, or until set enough to hold fruit.
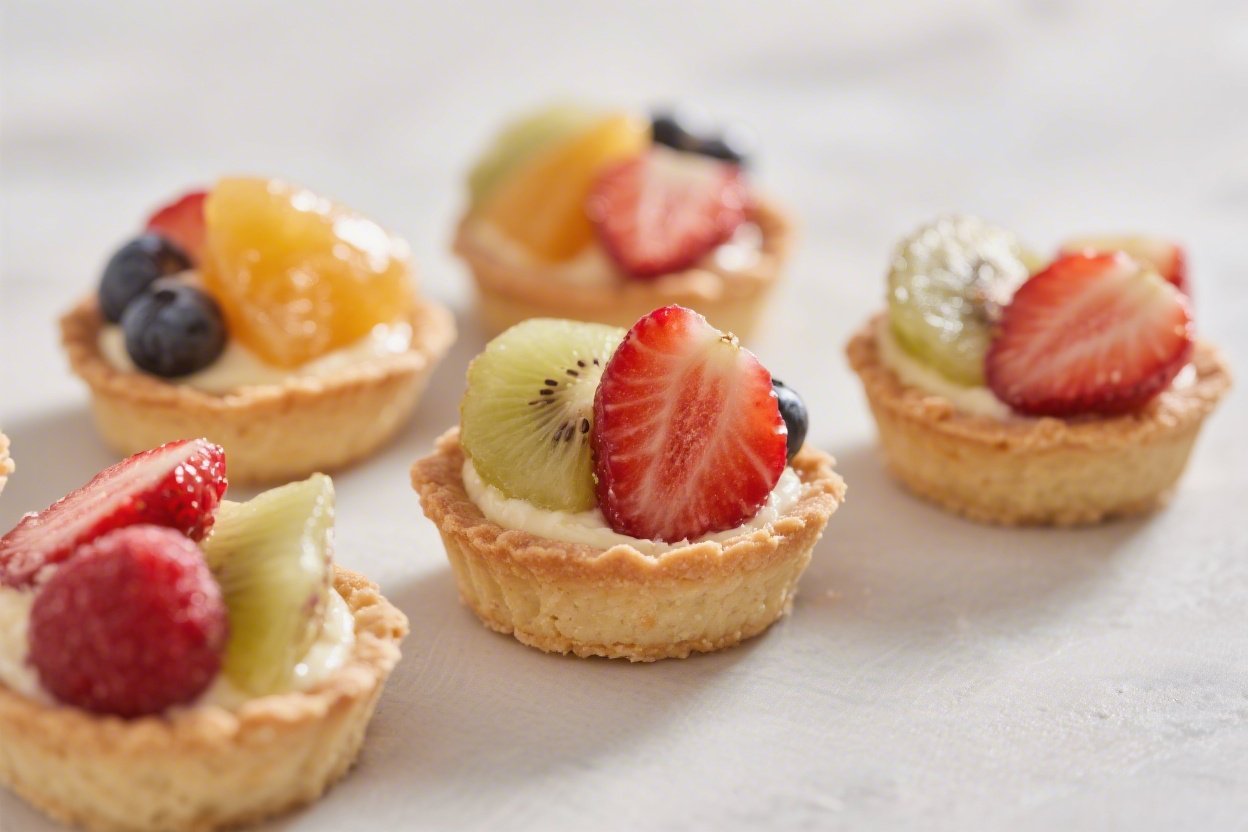
- Add fruit: Arrange fruit on top of each tartlet. Keep the pieces small so every bite has a mix of textures and flavors.
- Optional glaze: Warm apricot jam or honey with a splash of water until fluid.Brush lightly over fruit for shine and to slow browning.
- Serve or chill: Enjoy right away, or chill up to a few hours before serving. Add mint leaves just before serving, if using.
Why This Recipe Works
No baking required: The crumb crust sets in the fridge, saving time and keeping your kitchen cool.
Balanced textures: A buttery, crunchy crust pairs with a smooth, not-too-sweet filling and bright, fresh fruit.
Flexible and forgiving: Use any small tart pans, silicone molds, or even a muffin tin. Swap fruits based on season or what you already have.
Make-ahead friendly: The crust and filling hold up well, so you can assemble early and add fruit right before serving.
Ingredients
- For the crust:
- 1 1/2 cups (150 g) graham cracker crumbs or digestive biscuit crumbs
- 2 tablespoons granulated sugar (optional, to taste)
- 6 tablespoons (85 g) unsalted butter, melted
- Pinch of fine salt
- For the filling:
- 8 oz (225 g) cream cheese, softened
- 1/2 cup (120 ml) cold heavy cream
- 1/3 cup (40 g) powdered sugar, sifted
- 1 teaspoon vanilla extract
- 1–2 teaspoons lemon zest (to taste)
- 1–2 tablespoons fresh lemon juice (to taste)
- Pinch of salt
- For topping:
- 2 cups mixed fresh fruit (berries, kiwi, mango, peaches, or grapes), sliced if needed
- 2 tablespoons apricot jam or honey, warmed and thinned with a splash of water (optional glaze)
- Fresh mint leaves (optional)
- Tools: 8–10 mini tart pans (3–4 inches wide) with removable bottoms, silicone tart molds, or a standard muffin tin with liners
How to Make It
- Prep your pans: If using metal mini tart pans, lightly grease them.For a muffin tin, line cups with paper liners for easy removal.
- Make the crust: In a bowl, stir together crumbs, sugar, and salt. Add melted butter and mix until the texture resembles damp sand and clumps when pressed.
- Press and chill: Divide crumbs among pans. Press firmly on the bottom and slightly up the sides using the back of a spoon or a small measuring cup.Chill for 15–20 minutes to set.
- Whip the cream: In a cold bowl, beat the heavy cream to soft peaks. Set aside.
- Mix the cream cheese base: In another bowl, beat cream cheese, powdered sugar, vanilla, lemon zest, lemon juice, and a pinch of salt until smooth and fluffy, 1–2 minutes.
- Fold it together: Gently fold the whipped cream into the cream cheese mixture in two additions until smooth and airy. Do not overmix.
- Fill the tart shells: Spoon or pipe the filling into chilled crusts.Smooth the tops. Chill for at least 1 hour, or until set enough to hold fruit.
- Add fruit: Arrange fruit on top of each tartlet. Keep the pieces small so every bite has a mix of textures and flavors.
- Optional glaze: Warm apricot jam or honey with a splash of water until fluid.Brush lightly over fruit for shine and to slow browning.
- Serve or chill: Enjoy right away, or chill up to a few hours before serving. Add mint leaves just before serving, if using.
Storage Instructions
- Refrigerate: Store assembled tartlets in an airtight container for up to 2 days. Add delicate fruits (like sliced bananas or peaches) right before serving to avoid browning.
- Make-ahead: Crusts can be made 2–3 days ahead and kept chilled.Filling can be made a day ahead and stored covered; re-whisk gently before using.
- Freezing: Not ideal once topped with fresh fruit. If needed, freeze filled but untopped tartlets up to 1 month; thaw overnight in the fridge, then add fruit.
Health Benefits
- Fresh fruit provides fiber and antioxidants: Berries and colorful fruits bring vitamin C, phytonutrients, and natural sweetness.
- Portion control built in: Mini tartlets offer a sweet treat without going overboard.
- Customizable sweetness: You control the sugar in the crust and filling, and the fruit adds natural flavor.
- Healthy swaps are easy: Use Greek yogurt for part of the filling, choose whole-grain or nut-based crusts, or reduce added sugar.
Pitfalls to Watch Out For
- Crust crumbling: If the crust falls apart, you may need a bit more butter or to press it more firmly. Chill longer before filling.
- Runny filling: Overmixing can deflate the whipped cream.Also, make sure the cream cheese is fully softened and the cream is whipped to soft peaks.
- Watery fruit: Very juicy fruits (like ripe peaches) can weep. Pat them dry and glaze lightly to seal.
- Soggy bottoms: Don’t add fruit too early and avoid storing uncovered. Moisture can soften the crust.
- Too tart or too sweet: Taste the filling before chilling.Adjust lemon juice and powdered sugar to your preference.
Variations You Can Try
- Lemon-Blueberry: Add extra lemon zest and top with blueberries and a lemon zest sprinkle.
- Tropical: Use crushed coconut cookies for the crust. Top with mango, pineapple, and kiwi; finish with toasted coconut.
- Chocolate Lover’s: Stir 2 tablespoons cocoa powder into the crumb mixture and add 2 tablespoons more butter. Top with strawberries and a chocolate drizzle.
- Lightened Up: Swap half the cream cheese for 2% Greek yogurt.Sweeten gently with honey.
- Nutty Crust:</-strong> Use almond or hazelnut meal mixed with crumbs for a deeper flavor and extra crunch.
- Vegan: Use vegan butter, dairy-free cream cheese, and coconut cream whipped as the whipped component. Sweeten with maple syrup or powdered sugar.
- Spiced: Add a pinch of cinnamon or cardamom to the crust and a touch to the filling.
FAQ
Can I make these without mini tart pans?
Yes. A muffin tin with paper liners works well.
Press the crust into each cup, chill, then fill and top as usual. Silicone molds also release easily.
What fruits work best?
Firm, not-too-juicy fruits like berries, kiwi, grapes, and mango hold up nicely. If using peaches or nectarines, slice thinly and pat dry.
Avoid very watery fruits like melon on top unless serving immediately.
How can I make the filling lighter?
Replace half the cream cheese with Greek yogurt and reduce the powdered sugar slightly. You can also use light cream cheese, though the texture will be a bit softer.
How do I get clean edges when removing from pans?
Chill the tartlets well before unmolding. If using metal pans, place them on a small glass and let the ring drop away.
For muffin liners, peel gently while cold.
Can I add a chocolate or caramel layer?
Absolutely. Spread a thin layer of melted chocolate on the chilled crust and let it set before adding the filling, or drizzle caramel over the fruit right before serving.
What if my crust is too sweet?
Skip the added sugar in the crust, especially if your cookies are already sweet. Balance with extra lemon juice in the filling and tart fruits like raspberries.
Wrapping Up
Mini no-bake fruit tartlets are the kind of dessert that looks fancy but takes very little effort.
With a crisp crust, creamy center, and fresh fruit on top, they strike the perfect balance of texture and flavor. Make them your own with seasonal fruit and simple swaps, and enjoy a bright, beautiful treat any day of the week.