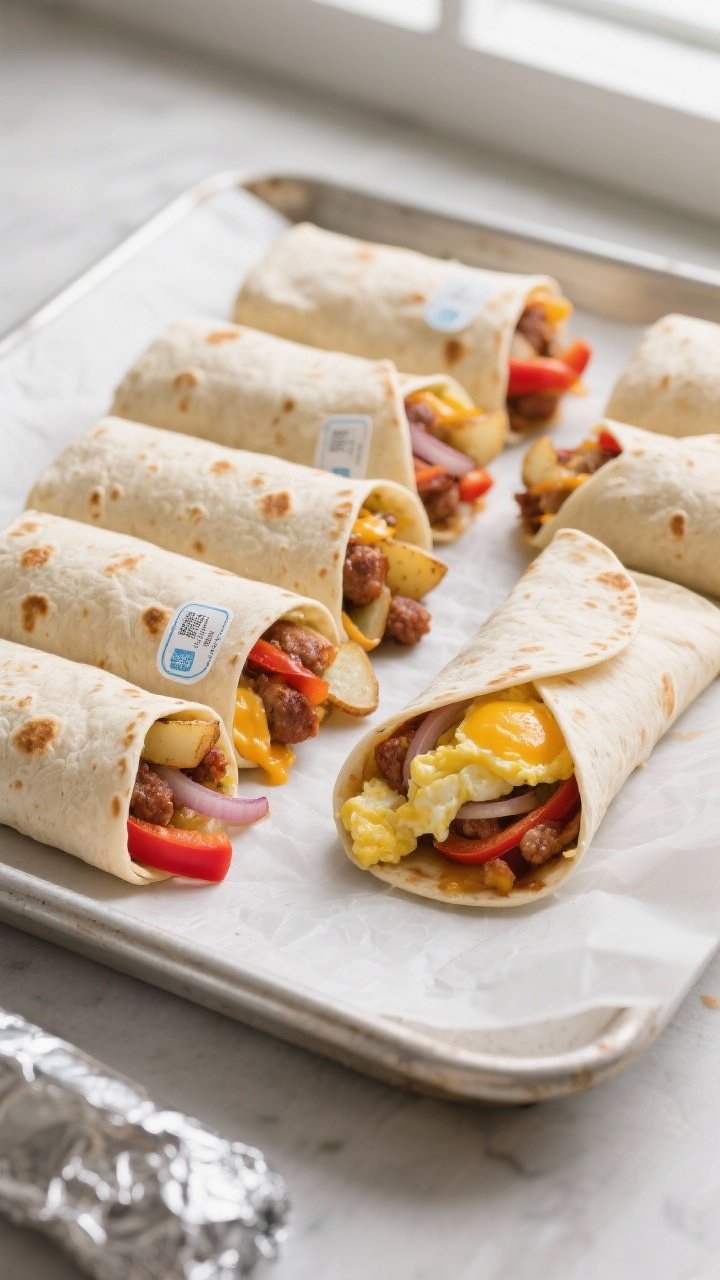
Freezer-Friendly Breakfast Burritos – Make-Ahead Mornings Made Easy
Start your day with a warm, satisfying breakfast that takes just minutes to reheat. Freezer-friendly breakfast burritos are the kind of meal prep that actually feels doable, and they taste just as good on a busy Wednesday as they do fresh on Sunday. The best part?
You get to pack them with flavors you love—eggs, cheese, veggies, and your favorite protein. Make a batch, stash them in the freezer, and you’ve got breakfast handled for the week (or two). No more skipping meals or grabbing something that doesn’t keep you full.

Freezer-Friendly Breakfast Burritos - Make-Ahead Mornings Made Easy
Ingredients
Method
- Cook the protein: In a large skillet over medium heat, cook sausage, bacon, or chorizo until browned and cooked through.Drain excess fat if needed. Set aside.
- Sauté veggies: In the same skillet, add a bit of oil if the pan is dry. Cook diced onion and bell pepper with a pinch of salt until soft and lightly browned, about 5–7 minutes.
- Add potatoes (optional): Stir in cooked potatoes or hash browns and cook until lightly crisp.Season with garlic powder, chili powder or smoked paprika, salt, and pepper. Transfer to a bowl.
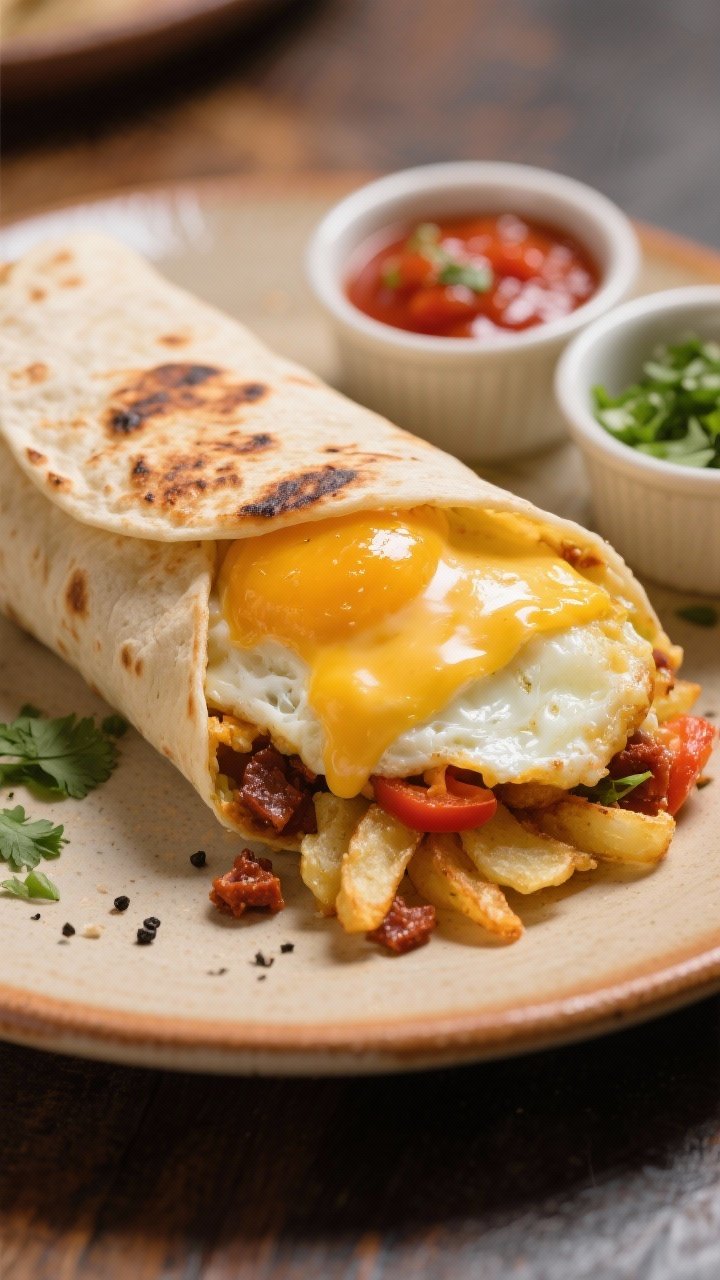
- Scramble the eggs: Whisk eggs with a pinch of salt and pepper. Melt butter in the skillet over medium-low heat.Cook eggs gently, stirring, until just set and still soft. Don’t overcook—they’ll heat again later.
- Warm tortillas: Briefly warm tortillas in a dry pan or microwave so they’re pliable and less likely to tear.
- Assemble: Lay out a tortilla. Add a modest layer of eggs, protein, veggie-potato mix, and a sprinkle of cheese. Don’t overfill; aim for 3/4 cup filling total.
- Fold and roll: Fold the sides in, then roll tightly from the bottom up. Place seam-side down.Repeat with remaining tortillas.
- Optional crisp: For better texture later, sear each burrito seam-side down in a lightly oiled skillet for 30–60 seconds per side. This helps seal and reduces sogginess.
- Cool completely: Let burritos cool on a rack for 15–20 minutes. Cooling prevents steam from ruining the tortillas in the freezer.
- Wrap for freezing: Wrap each burrito tightly in parchment, then foil, or just use a snug double layer of parchment. Place in a labeled freezer bag.Freeze up to 3 months.
What Makes This Recipe So Good
- Meal prep made simple: One cooking session gives you 8–12 hearty breakfasts.
- Customizable: Swap proteins, add veggies, tweak the spice—make them your way.
- Budget-friendly: Uses everyday ingredients you probably already have.
- Great texture after freezing: The fillings stay tender, not soggy, with a few easy tricks.
- Portable and satisfying: Pack them for on-the-go mornings, road trips, or post-workout fuel.
Ingredients
- 10 large flour tortillas (8–10 inches), warmed
- 12 large eggs
- 1 cup shredded cheese (cheddar, pepper jack, or a blend)
- 1 pound breakfast sausage, bacon, chorizo, or plant-based crumbles
- 1 medium onion, diced
- 1 bell pepper, diced
- 1–2 cups cooked potatoes or hash browns (optional, but great for bulk)
- 2 tablespoons butter or olive oil
- 1 teaspoon garlic powder
- 1 teaspoon chili powder or smoked paprika
- Salt and black pepper, to taste
- Hot sauce or salsa, to serve (add after reheating to avoid sogginess)
- Foil or parchment paper and freezer-safe bags for wrapping
How to Make It
- Cook the protein: In a large skillet over medium heat, cook sausage, bacon, or chorizo until browned and cooked through.
Drain excess fat if needed. Set aside.
- Sauté veggies: In the same skillet, add a bit of oil if the pan is dry. Cook diced onion and bell pepper with a pinch of salt until soft and lightly browned, about 5–7 minutes.
- Add potatoes (optional): Stir in cooked potatoes or hash browns and cook until lightly crisp.
Season with garlic powder, chili powder or smoked paprika, salt, and pepper. Transfer to a bowl.
- Scramble the eggs: Whisk eggs with a pinch of salt and pepper. Melt butter in the skillet over medium-low heat.
Cook eggs gently, stirring, until just set and still soft. Don’t overcook—they’ll heat again later.
- Warm tortillas: Briefly warm tortillas in a dry pan or microwave so they’re pliable and less likely to tear.
- Assemble: Lay out a tortilla. Add a modest layer of eggs, protein, veggie-potato mix, and a sprinkle of cheese. Don’t overfill; aim for 3/4 cup filling total.
- Fold and roll: Fold the sides in, then roll tightly from the bottom up. Place seam-side down.
Repeat with remaining tortillas.
- Optional crisp: For better texture later, sear each burrito seam-side down in a lightly oiled skillet for 30–60 seconds per side. This helps seal and reduces sogginess.
- Cool completely: Let burritos cool on a rack for 15–20 minutes. Cooling prevents steam from ruining the tortillas in the freezer.
- Wrap for freezing: Wrap each burrito tightly in parchment, then foil, or just use a snug double layer of parchment. Place in a labeled freezer bag.
Freeze up to 3 months.
Keeping It Fresh
Good freezing is all about moisture control and tight wrapping. Let burritos cool, wrap them well, and squeeze out extra air in the bag. If you’re adding salsa, avocado, or sour cream, keep those off until serving.
Moist fillings can make tortillas gummy.
For reheating, remove foil, keep the parchment on, and microwave at 50–70% power for 2–3 minutes, flipping halfway. Then, for the best texture, finish in a hot skillet or toaster oven for 2–3 minutes to crisp the outside. Low-and-slow microwaving keeps the center from going rubbery.
Why This is Good for You
- Protein-packed: Eggs, cheese, and your choice of meat or plant protein keep you full.
- Balanced carbs: Tortillas and potatoes provide steady energy, especially helpful on busy mornings.
- Vegetable boost: Peppers and onions add fiber and vitamins. Add spinach, mushrooms, or tomatoes for even more.
- Portion control: Each burrito is an easy, pre-portioned meal—no guesswork.
- Less morning stress: A ready-to-go breakfast means you’re more likely to eat well instead of skipping.
Common Mistakes to Avoid
- Overfilling: Too much filling leads to torn tortillas and messy reheating.
- Wet ingredients inside: Skip fresh salsa and watery veggies before freezing.
Add them after reheating.
- Overcooked eggs: They’ll turn rubbery after reheating. Keep them soft-set.
- Skipping the cool-down: Trapped steam ruins texture and creates ice crystals.
- Loose wrapping: Air is the enemy. Wrap tightly in parchment and foil, then bag.
Variations You Can Try
- Southwest: Black beans, corn, pepper jack, and a dash of cumin.
Add pickled jalapeños after reheating.
- Veggie Lover’s: Sautéed mushrooms, spinach, onions, and feta. Skip meat and add extra eggs or tofu crumbles.
- Steak and Egg: Thinly sliced cooked steak, peppers, onions, cheddar, and hot sauce.
- Turkey Sausage and Sweet Potato: Roasted sweet potato cubes, turkey sausage, and smoked paprika.
- Green Chile: Diced roasted green chiles, potatoes, scrambled eggs, and Monterey Jack.
- High-Protein: Extra egg whites, cottage cheese folded into the eggs, and lean turkey bacon.
- Low-Carb Wraps: Use low-carb tortillas or egg wraps; avoid potatoes and add more veggies.
FAQ
How long can I freeze breakfast burritos?
They keep well for up to 3 months if wrapped tightly and stored in freezer-safe bags. Label with the date so you actually remember to use them.
What’s the best way to reheat from frozen?
Microwave at 50–70% power for 2–3 minutes, flipping halfway, then crisp in a skillet or toaster oven for 2–3 minutes.
If you have time, thaw in the fridge overnight for even more even heating.
Can I use corn tortillas?
You can, but they’re more delicate and prone to cracking. If you prefer corn, double up the tortillas and warm them well before rolling, or make smaller burritos.
How do I prevent soggy burritos?
Keep wet ingredients out, cool completely before wrapping, and finish reheating on a hot pan to crisp the outside. Avoid overstuffing and make sure potatoes are cooked until lightly crisp before assembling.
Can I make them dairy-free?
Yes.
Skip the cheese or use dairy-free shreds. Cook eggs in oil instead of butter, and check that your tortillas are dairy-free.
What’s a good vegetarian protein option?
Try black beans, pinto beans, refried beans, or crumbled tofu seasoned with chili powder and garlic. Plant-based sausage also works well and freezes nicely.
Do I have to use potatoes?
No.
They add bulk and make the burritos more filling, but you can leave them out and add more veggies or eggs.
Can I bake a whole batch at once to reheat?
Yes. Place unwrapped burritos on a baking sheet and bake at 350°F (175°C) for 20–30 minutes from frozen, or 10–15 minutes if thawed, until hot in the center. Wrap in foil for softer tortillas, or leave uncovered for a bit of crisp.
In Conclusion
Freezer-friendly breakfast burritos are a smart, tasty way to simplify mornings.
With a little planning, you’ll have a warm, balanced meal ready whenever you are. Keep the fillings simple, wrap them tight, and reheat gently for the best results. Make a batch this week, and your future self will thank you with every easy, satisfying bite.