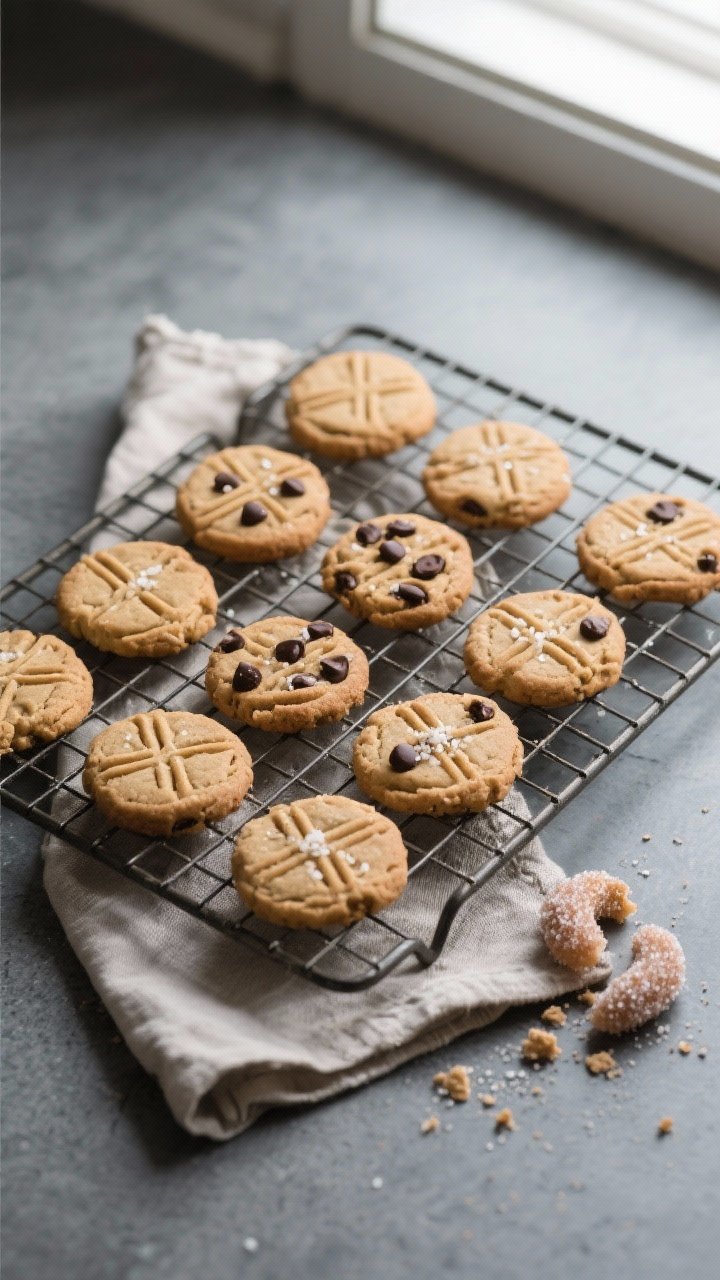
Classic Peanut Butter Cookies – Simple, Soft, and Perfectly Nutty
Peanut butter cookies hit that sweet spot between nostalgic and irresistible. They’re soft in the middle, lightly crisp at the edges, and packed with peanut flavor. You don’t need fancy ingredients or special equipment—just a bowl, a whisk, and a craving.
Whether you’re baking for a weekday treat or a holiday tray, these cookies deliver every time. The classic crisscross pattern on top makes them instantly recognizable and incredibly inviting.

Classic Peanut Butter Cookies – Simple, Soft, and Perfectly Nutty
Ingredients
Method
- Preheat the oven. Set your oven to 350°F (175°C).Line two baking sheets with parchment paper for even baking and easy cleanup.
- Cream the fats and sugars. In a large bowl, beat the softened butter, peanut butter, granulated sugar, and brown sugar until light and fluffy, about 2 minutes. This step builds structure and gives you soft centers.
- Add the egg and vanilla. Beat in the egg and vanilla extract until fully combined and glossy. Scrape down the bowl so everything mixes evenly.
- Whisk the dry ingredients. In a separate bowl, whisk together the flour, baking soda, baking powder, and salt.This avoids clumps and ensures even lift.
- Combine wet and dry. Add the dry ingredients to the peanut butter mixture. Mix on low just until the flour disappears. Do not overmix or the cookies can turn tough.
- Portion the dough. Scoop the dough into 1–1.5 tablespoon portions.Roll each ball lightly between your palms. If you like, roll the balls in granulated sugar for a crackly finish.
- Crisscross pattern. Place dough balls on the prepared sheets, leaving 2 inches between them. Press each ball with the back of a fork in one direction, then again in the opposite direction to make the classic crisscross.Aim for about 1/2-inch thickness.
- Bake. Bake for 9–11 minutes, rotating the pans halfway through. The edges should look set and lightly golden, but the centers will still look soft. They’ll firm up as they cool.
- Cool. Let the cookies rest on the baking sheet for 5 minutes, then transfer to a wire rack.This helps them set without drying out.
- Finish (optional). While warm, sprinkle with a pinch of flaky sea salt for contrast. If using chocolate chips or chopped peanuts, fold them into the dough before portioning in step 6.
What Makes This Recipe So Good

These cookies bring together everything people love about homemade baking: reliable results, a short ingredient list, and loads of flavor. They’re not overly sweet and have just the right amount of salt to balance the richness of the peanut butter.
The dough comes together quickly and doesn’t demand long chilling time. You can customize them with chocolate chips, a sugar sprinkle, or a little sea salt on top. Plus, they freeze beautifully, so you can bake now and enjoy later.
Shopping List
- Creamy peanut butter (not natural, unless specified)—about 1 cup
- Unsalted butter, softened—1/2 cup (1 stick)
- Granulated sugar—1/2 cup
- Light brown sugar, packed—1/2 cup
- Large egg—1
- Vanilla extract—1 teaspoon
- All-purpose flour—1 1/3 cups
- Baking soda—1 teaspoon
- Baking powder—1/2 teaspoon
- Fine sea salt—1/2 teaspoon
- Optional: Extra granulated sugar for rolling, flaky sea salt, chocolate chips, or chopped peanuts
Step-by-Step Instructions
- Preheat the oven. Set your oven to 350°F (175°C).Line two baking sheets with parchment paper for even baking and easy cleanup.
- Cream the fats and sugars. In a large bowl, beat the softened butter, peanut butter, granulated sugar, and brown sugar until light and fluffy, about 2 minutes. This step builds structure and gives you soft centers.
- Add the egg and vanilla. Beat in the egg and vanilla extract until fully combined and glossy. Scrape down the bowl so everything mixes evenly.
- Whisk the dry ingredients. In a separate bowl, whisk together the flour, baking soda, baking powder, and salt.This avoids clumps and ensures even lift.
- Combine wet and dry. Add the dry ingredients to the peanut butter mixture. Mix on low just until the flour disappears. Do not overmix or the cookies can turn tough.
- Portion the dough. Scoop the dough into 1–1.5 tablespoon portions.Roll each ball lightly between your palms. If you like, roll the balls in granulated sugar for a crackly finish.
- Crisscross pattern. Place dough balls on the prepared sheets, leaving 2 inches between them. Press each ball with the back of a fork in one direction, then again in the opposite direction to make the classic crisscross.Aim for about 1/2-inch thickness.
- Bake. Bake for 9–11 minutes, rotating the pans halfway through. The edges should look set and lightly golden, but the centers will still look soft. They’ll firm up as they cool.
- Cool. Let the cookies rest on the baking sheet for 5 minutes, then transfer to a wire rack.This helps them set without drying out.
- Finish (optional). While warm, sprinkle with a pinch of flaky sea salt for contrast. If using chocolate chips or chopped peanuts, fold them into the dough before portioning in step 6.
Storage Instructions
Store cooled cookies in an airtight container at room temperature for up to 5 days. To keep them extra soft, tuck in a slice of sandwich bread; it helps regulate moisture.
For longer storage, freeze baked cookies in a single layer, then transfer to a freezer bag for up to 2 months. Reheat from frozen in a 300°F (150°C) oven for 5–7 minutes to refresh the texture.
You can also freeze the dough. Scoop and crisscross the dough, then freeze on a sheet until solid.
Transfer to a freezer bag and bake straight from frozen, adding 1–2 minutes to the bake time.
Health Benefits
- Protein and healthy fats: Peanut butter offers plant-based protein and monounsaturated fats that promote satiety.
- Energy-dense but satisfying: These cookies can curb cravings with a smaller portion thanks to their rich, nutty flavor.
- Customizable sweetness: You can reduce the sugar slightly or use a natural peanut butter with no added sugar if you adjust the texture.
- Gluten-free option: With a trusted 1:1 gluten-free flour blend, you can make them accessible to more diets while keeping the classic taste.
Of course, these are still cookies, so enjoy them in moderation. Pairing one with a glass of milk or a high-protein snack can keep your energy steady.
What Not to Do
- Don’t use oily, fully natural peanut butter without adjustments. The dough can spread too much and bake unevenly. If you prefer natural peanut butter, choose a well-stirred, thicker brand and chill the dough for 30 minutes.
- Don’t overbake. Dry peanut butter cookies are hard to rescue.Pull them when the edges set and let carryover heat finish the job.
- Don’t skip the crisscross. It’s not just for looks. The pattern flattens the dough for even baking and the right texture.
- Don’t overmix the flour. Too much mixing develops gluten, which can make cookies tough and cakey.
- Don’t crowd the pan. Give each cookie room to spread for clean edges and consistent baking.
Alternatives
- Crunchy peanut butter: Swap in crunchy for added texture. You’ll get little nutty bits in every bite.
- Peanut butter chocolate chip: Fold in 1 cup of chocolate chips.Dark chocolate pairs especially well with peanut butter’s richness.
- Peanut butter thumbprints: Skip the crisscross and press a thumbprint into each ball. After baking, fill with jam or melted chocolate.
- Gluten-free: Use a 1:1 gluten-free baking flour with xanthan gum. Watch the bake time, as they may brown a touch faster.
- Lower sugar: Reduce total sugar by up to 2 tablespoons without major texture changes.Any more and the cookies may spread less and taste less balanced.
- Sea salt finish: A tiny pinch of flaky salt on warm cookies adds contrast and makes the peanut flavor pop.
FAQ
Can I use natural peanut butter?
Yes, but choose a thick, well-stirred brand. If it’s very runny, chill the dough for 30–45 minutes and consider adding an extra tablespoon of flour to prevent excessive spreading.
How do I make them softer or chewier?
For softer cookies, shorten the bake time by about a minute and keep them slightly underbaked in the center. For chewier cookies, use all brown sugar (1 cup total) and reduce granulated sugar entirely.
Do I need to chill the dough?
With standard creamy peanut butter, chilling usually isn’t necessary.
If your kitchen is warm or your peanut butter is oily, a short chill helps the cookies keep their shape.
Why do my cookies crack too much?
Overbaking and too much flour are common reasons. Measure flour by fluffing, spooning, and leveling, and pull the cookies as soon as the edges set.
Can I make them larger?
Absolutely. Use 2 tablespoons of dough per cookie and bake for 11–13 minutes.
Keep the crisscross pattern and give them extra space on the sheet.
What’s the best way to measure peanut butter?
For accuracy, weigh it if you can (1 cup is about 260 grams). If using cups, lightly spray the measuring cup with oil first so the peanut butter releases easily.
How do I make them dairy-free?
Swap the butter for a plant-based butter stick (not spreadable from a tub). Check labels to ensure the product has similar fat content for the right texture.
In Conclusion
Classic Peanut Butter Cookies are the kind of treat that never goes out of style.
They’re easy to make, deeply comforting, and endlessly customizable. With a few simple steps and everyday ingredients, you’ll have a batch that’s soft, nutty, and exactly what you were craving. Keep this recipe handy—you’ll come back to it again and again.