Classic Chicken Kiev With Garlic Butter – Crispy, Juicy, and Comforting
Chicken Kiev is one of those dishes that feels fancy but also deeply comforting. Golden, crispy breadcrumbs on the outside, juicy chicken inside, and a puddle of fragrant garlic butter that pours out with the first cut. It’s a restaurant-style favorite you can absolutely make at home with a bit of patience and a few smart tricks.
This version keeps things classic but streamlined, so you get the signature buttery center without stress. If you love a satisfying crunch and big garlic flavor, this one belongs in your rotation.
Classic Chicken Kiev With Garlic Butter - Crispy, Juicy, and Comforting
Ingredients
Method
- Make the garlic butter. In a bowl, mash together softened butter, minced garlic, parsley, lemon zest, lemon juice, salt, and pepper. Taste and adjust with a pinch more salt or lemon if needed.
- Shape and chill the butter. Spoon the butter onto a small sheet of parchment or plastic wrap.Roll into a tight log about 1 inch thick. Chill in the freezer for 20–30 minutes until firm, but not rock hard.
- Prep the chicken. Place a chicken breast between two sheets of plastic wrap. Gently pound to about 1/3 inch thickness, focusing on making it even.Repeat with all breasts.
- Season the chicken. Lightly season both sides with salt and pepper. This helps amplify the flavor of the butter and crisp coating.
- Add the butter core. Slice the chilled butter log into 4 equal pieces. Place one piece in the center of each chicken breast.Fold the sides over the butter, then roll up from the bottom, tucking in edges to fully enclose. Aim for a neat, tight package.
- Set up your breading station. Put flour in one shallow dish. In a second dish, whisk eggs with milk or water.In a third dish, combine breadcrumbs with paprika, garlic powder, onion powder, salt, and pepper.
- Double bread for a secure seal. Dredge each rolled chicken in flour, shaking off excess. Dip in egg, then coat in breadcrumbs, pressing to adhere. For extra insurance, dip again in egg and then a second layer of breadcrumbs.Place seam-side down on a plate.
- Chill the breaded chicken. Refrigerate for at least 30 minutes (or up to 12 hours). This helps the coating stick and reduces butter leaks.
- Preheat your oven. Heat to 375°F (190°C). Place a wire rack over a baking sheet to keep the bottom crisp.
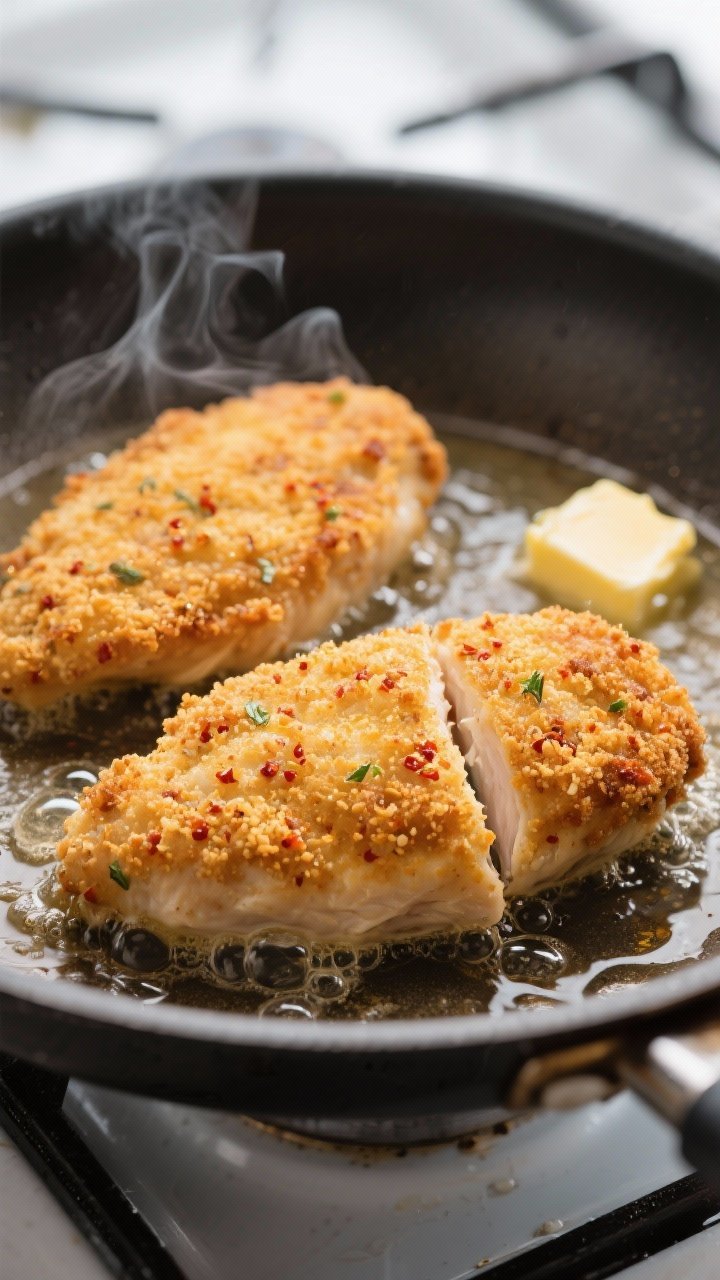
- Shallow-fry for color. In a large skillet, heat about 1/4 inch of oil over medium to medium-high.Add a tablespoon of butter for flavor if you like. Fry chicken 2–3 minutes per side until golden. Don’t cook through; just build color.
- Finish in the oven. Transfer chicken to the wire rack, seam-side down.Bake 12–18 minutes, depending on thickness, until an instant-read thermometer in the center reads 165°F (74°C).
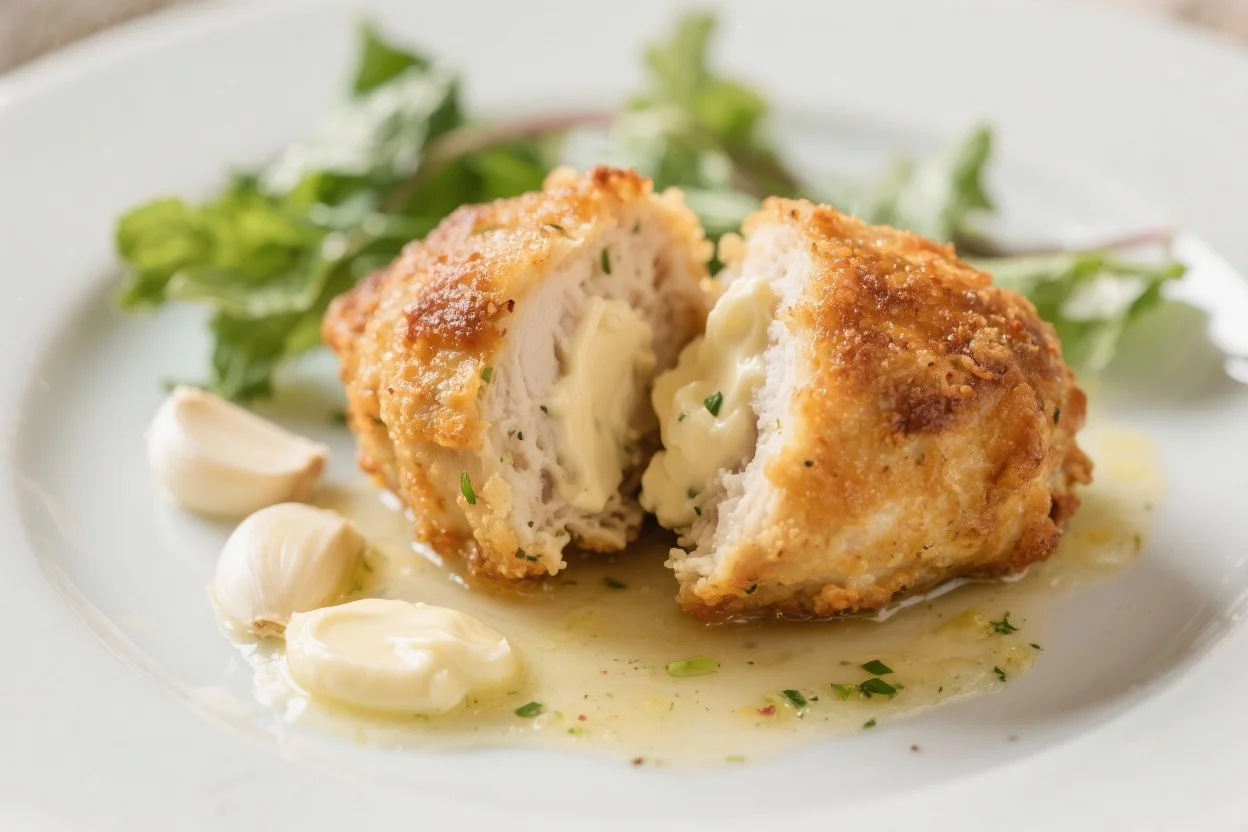
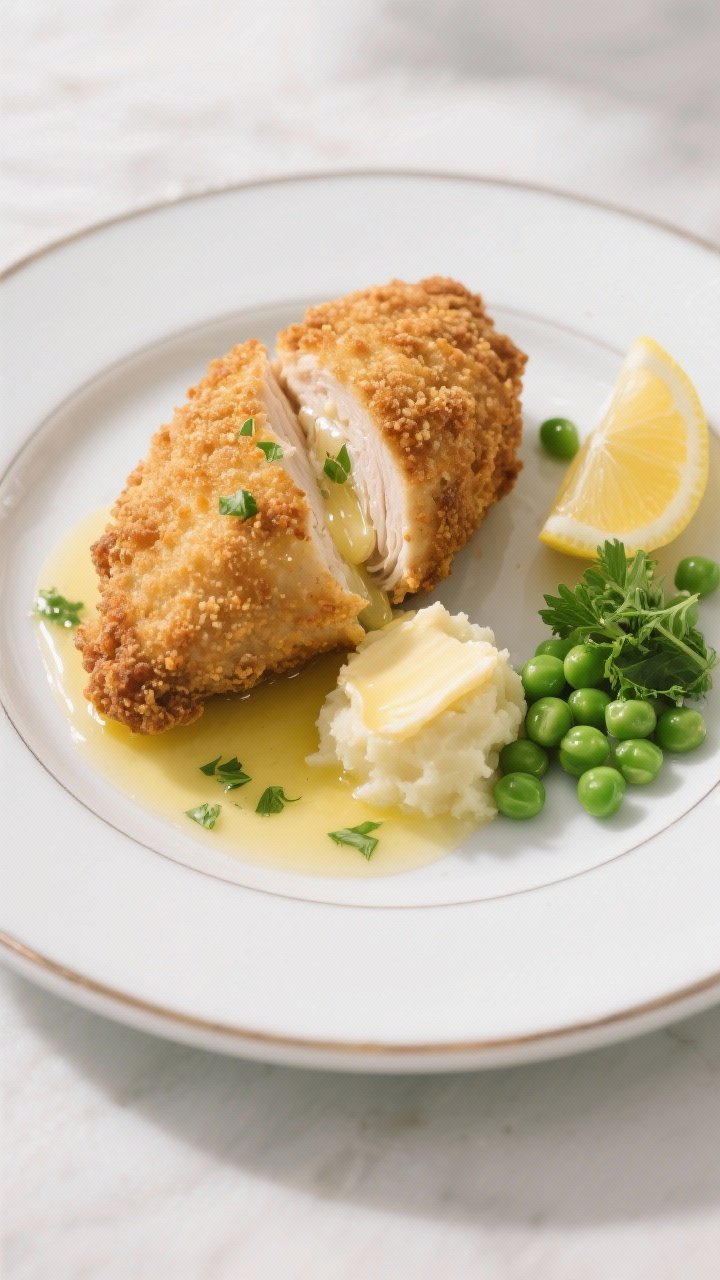
- Rest and serve. Let rest 5 minutes to settle the juices. Serve with lemon wedges, herbs, and your favorite sides. Cut gently to reveal that molten garlic butter.
What Makes This Recipe So Good
- That signature butter core: A simple compound butter with garlic, parsley, and lemon makes the chicken taste rich and bright at the same time.
- Crispy, not greasy: Proper chilling and double breading lock in the butter and yield a crisp shell that doesn’t soak up oil.
- Juicy chicken: Pounding the breasts to an even thickness ensures fast, even cooking and tender meat.
- Classic flavor, simple method: No fussy steps—just smart prep and a quick pan-fry followed by a short bake.
- Make-ahead friendly: You can roll and chill the butter and even assemble the chicken ahead for easy weeknight cooking.
Shopping List
- Chicken: 4 boneless, skinless chicken breasts
- For the garlic butter: 8 tablespoons (1 stick) unsalted butter, 2–3 garlic cloves, finely minced; 2 tablespoons chopped fresh parsley; 1 teaspoon lemon zest; 1–2 teaspoons lemon juice; pinch of salt and black pepper
- Breading: 1 cup all-purpose flour; 2 large eggs; 1–2 tablespoons milk or water; 1.5 cups breadcrumbs (panko or fine dry crumbs); 1/2 teaspoon paprika; 1/2 teaspoon garlic powder; 1/2 teaspoon onion powder; 1/2 teaspoon kosher salt; black pepper to taste
- For cooking: Neutral oil (such as canola or sunflower) for shallow frying; 1–2 tablespoons butter (optional) for extra browning
- To serve (optional): Lemon wedges, fresh herbs, mashed potatoes, or a simple green salad
Step-by-Step Instructions
- Make the garlic butter. In a bowl, mash together softened butter, minced garlic, parsley, lemon zest, lemon juice, salt, and pepper. Taste and adjust with a pinch more salt or lemon if needed.
- Shape and chill the butter. Spoon the butter onto a small sheet of parchment or plastic wrap.Roll into a tight log about 1 inch thick. Chill in the freezer for 20–30 minutes until firm, but not rock hard.
- Prep the chicken. Place a chicken breast between two sheets of plastic wrap. Gently pound to about 1/3 inch thickness, focusing on making it even.Repeat with all breasts.
- Season the chicken. Lightly season both sides with salt and pepper. This helps amplify the flavor of the butter and crisp coating.
- Add the butter core. Slice the chilled butter log into 4 equal pieces. Place one piece in the center of each chicken breast.Fold the sides over the butter, then roll up from the bottom, tucking in edges to fully enclose. Aim for a neat, tight package.
- Set up your breading station. Put flour in one shallow dish. In a second dish, whisk eggs with milk or water.In a third dish, combine breadcrumbs with paprika, garlic powder, onion powder, salt, and pepper.
- Double bread for a secure seal. Dredge each rolled chicken in flour, shaking off excess. Dip in egg, then coat in breadcrumbs, pressing to adhere. For extra insurance, dip again in egg and then a second layer of breadcrumbs.Place seam-side down on a plate.
- Chill the breaded chicken. Refrigerate for at least 30 minutes (or up to 12 hours). This helps the coating stick and reduces butter leaks.
- Preheat your oven. Heat to 375°F (190°C). Place a wire rack over a baking sheet to keep the bottom crisp.
- Shallow-fry for color. In a large skillet, heat about 1/4 inch of oil over medium to medium-high.Add a tablespoon of butter for flavor if you like. Fry chicken 2–3 minutes per side until golden. Don’t cook through; just build color.
- Finish in the oven. Transfer chicken to the wire rack, seam-side down.Bake 12–18 minutes, depending on thickness, until an instant-read thermometer in the center reads 165°F (74°C).
- Rest and serve. Let rest 5 minutes to settle the juices. Serve with lemon wedges, herbs, and your favorite sides. Cut gently to reveal that molten garlic butter.
Keeping It Fresh
- Refrigeration: Store leftovers in an airtight container for up to 3 days.Reheat in a 325°F (165°C) oven for 10–15 minutes to revive crispness.
- Freezing raw: Assemble and bread the chicken, then freeze on a baking sheet until firm. Transfer to a freezer bag for up to 2 months. Cook from frozen: add 5–10 minutes to oven time.
- Freezing cooked: Cool completely, wrap tightly, and freeze up to 1 month.Reheat in the oven at 350°F (175°C) until hot and crisp.
- Butter log: Make extra compound butter and keep it frozen for quick future batches or to melt over steaks and veggies.
Health Benefits
- Protein-rich: Chicken breast offers lean protein that helps with muscle maintenance and keeps you full.
- Portion control: Because the dish is rich, a reasonable portion satisfies cravings without overdoing it.
- Fresh aromatics: Garlic and parsley add antioxidants, while lemon brightens flavor so you can use a lighter hand with salt.
- Flexible sides: Pair with a crisp salad, steamed green beans, or roasted carrots to balance the richness with fiber and vitamins.
What Not to Do
- Don’t skip chilling. Warm butter will leak during cooking. Chilling the butter and the breaded rolls is your best insurance.
- Don’t pound unevenly. Thin spots tear and thick spots undercook. Aim for even thickness to seal well and cook evenly.
- Don’t overheat the oil. Too hot and the crust burns before the inside cooks; too cool and the coating absorbs oil.Medium to medium-high is your sweet spot.
- Don’t rush the rest. Cutting immediately can push butter out. Give it a few minutes to settle.
- Don’t overload the pan. Crowding drops the oil temperature and leads to soggy crusts.
Alternatives
- Herb variations: Swap parsley for dill, chives, or tarragon. Add a pinch of smoked paprika or chili flakes to the butter for gentle heat.
- Cheese twist: Mix a little grated Parmesan into the breadcrumbs for extra savoriness.
- Air fryer method: Spray breaded, chilled chicken lightly with oil and cook at 370°F (188°C) for 14–18 minutes, flipping halfway, until 165°F.
- Gluten-free: Use gluten-free flour and breadcrumbs.Check labels on spices and stock any cross-contamination concerns.
- Lighter version: Skip pan-frying and bake on a rack at 400°F (200°C) for 20–25 minutes, spraying with oil for color. The crust won’t be quite as rich but still crisp.
FAQ
How do I stop the butter from leaking out?
Make sure the butter is well chilled, the chicken is rolled tightly with edges tucked in, and you double-bread the rolls. Chilling the breaded chicken again before cooking helps seal everything in.
Can I use chicken thighs instead of breasts?
You can, but it’s trickier to roll tightly.
If using boneless, skinless thighs, choose larger pieces, pound gently, and overlap edges to prevent gaps. Adjust cooking time and use a thermometer.
What oil is best for frying?
Use a neutral, high-heat oil like canola, sunflower, or peanut oil. These stay stable at frying temperatures and won’t overpower the garlic butter flavor.
Do I have to finish in the oven?
Finishing in the oven ensures the chicken cooks through without scorching the crust.
Pan-frying alone often leaves the center underdone or the crust too dark.
Can I make it ahead?
Yes. You can assemble and bread the chicken up to a day ahead and keep it refrigerated. Or freeze the assembled rolls and cook from frozen with extra oven time.
What should I serve with Chicken Kiev?
Mashed potatoes, buttered peas, a crisp green salad, or roasted asparagus work beautifully.
A squeeze of lemon and fresh herbs on top brightens the dish.
Can I reduce the garlic?
Absolutely. Use one clove or even roasted garlic for a gentler, sweeter flavor. Adjust to your taste without changing the method.
Wrapping Up
Classic Chicken Kiev with Garlic Butter is all about smart prep and simple technique.
With a chilled butter core, tight roll, and crisp double breading, you’ll get that satisfying pour of garlic butter every time. Serve it with fresh lemon and a green side to balance the richness, and enjoy a timeless dish that feels both special and comforting. This is the kind of recipe that turns a regular evening into a small celebration.