12 Walk-in Pantry Ideas That’ll Make You Feel Like a Pro Chef
Let’s be honest: a walk-in pantry is the home decor equivalent of a humble brag. It’s practical, it’s gorgeous, and when done right, it makes everyday life feel like a lifestyle shoot.
If yours looks more “mystery closet” than “mini market,” no worries. Here are 12 walk-in pantry ideas that are clever, stylish, and totally doable—whether you’re building new or zhuzhing what you’ve got.
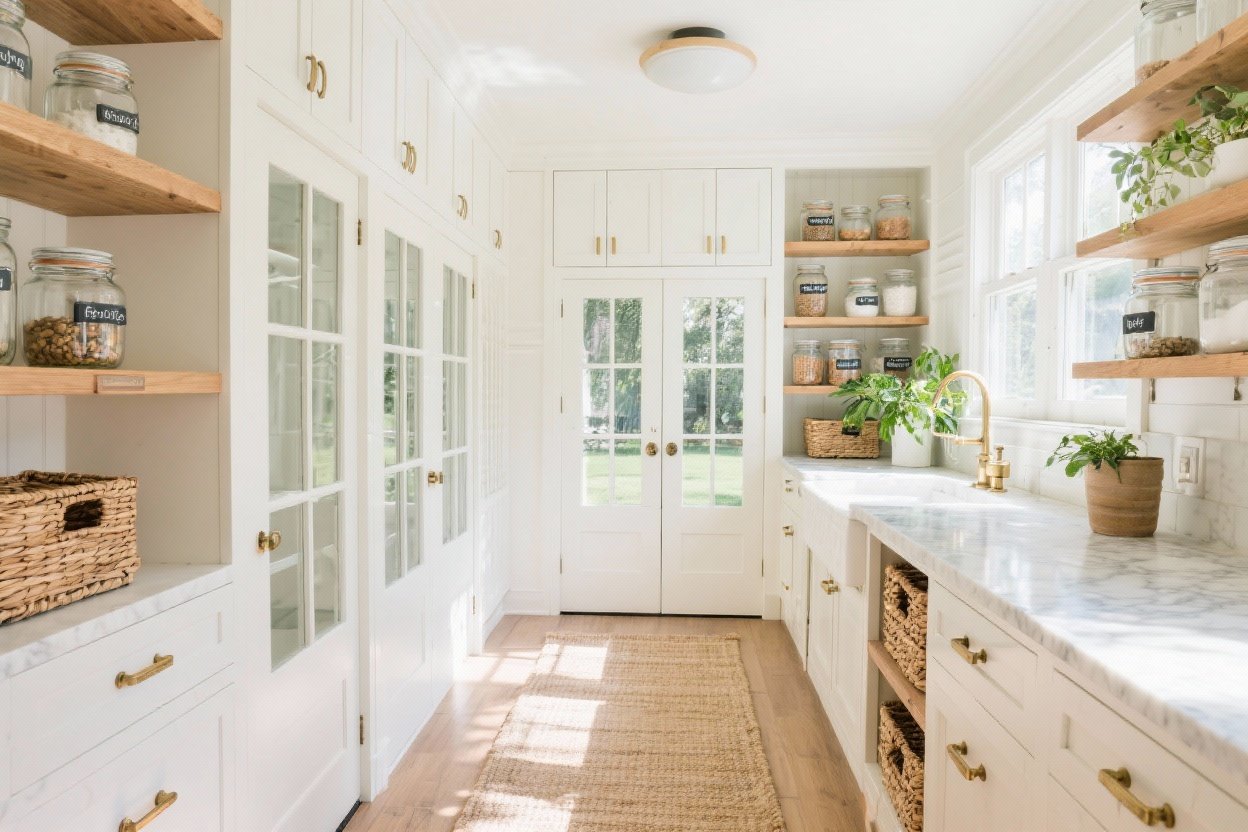
1. Go Floor-to-Ceiling (And Don’t Waste a Single Inch)
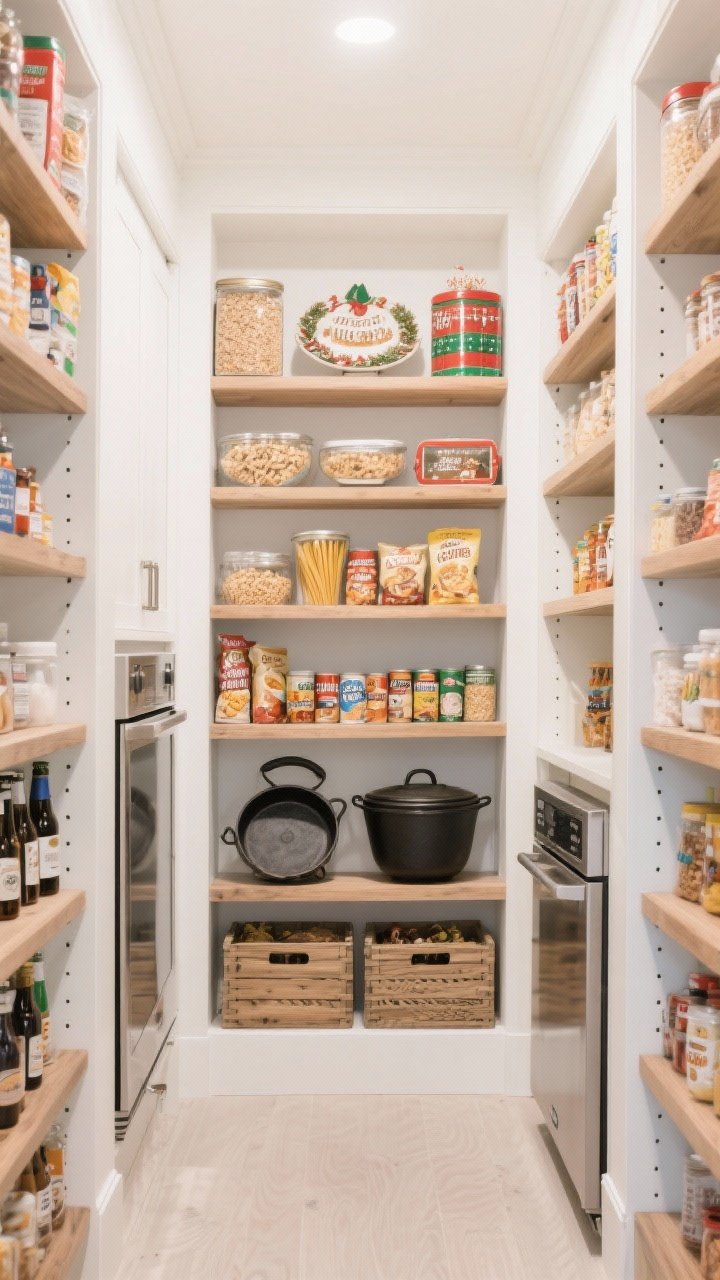
If your pantry walls stop halfway, you’re missing prime real estate. Build floor-to-ceiling shelving to maximize storage and make the space feel custom. Use a mix of deep and shallow shelves so nothing gets lost behind six bags of flour.
Smart Setup Tips
- Top shelves: Bulk buys and seasonal gear (party platters, holiday tins).
- Middle shelves: Everyday items—snacks, cereal, pasta, canned goods.
- Lower shelves: Appliances and heavy stuff like cast iron and drink crates.
FYI: Adjustable shelves are your best friend. Your pantry should evolve with your grocery habits, not bully you into buying only short cereal boxes.
2. Bring In Beautiful (And Practical) Containers
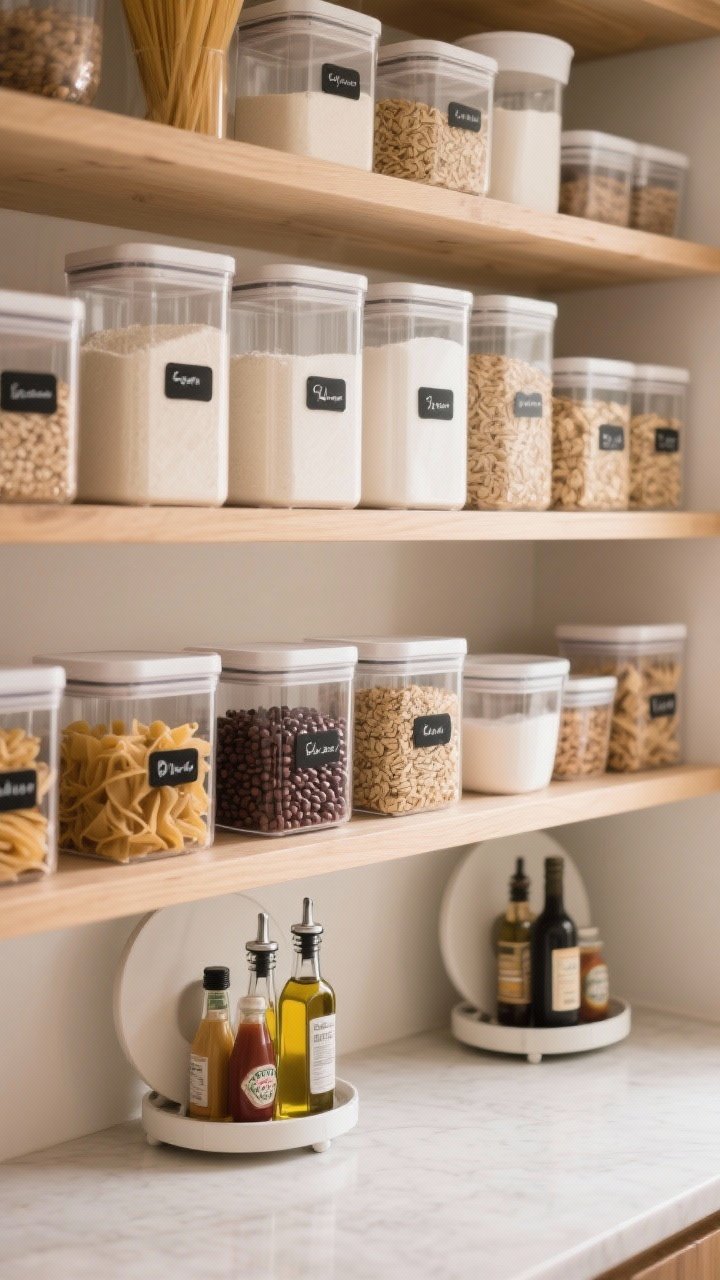
Here’s the glow-up: ditch torn boxes and mismatched wrappers and switch to clear canisters and labeled jars. Suddenly your pantry looks like it has its life together. Bonus: you’ll actually see when you’re out of rice before dinner goes off the rails.
Container MVPs
- Square or rectangular canisters for flour, sugar, oats—stackable equals space-saving.
- Glass jars for pasta and beans (they’re heavy, so store at mid-height).
- Airtight bins for snacks and baking supplies—no stale chips on your watch.
- Lazy Susans for oils, vinegars, and sauces to avoid a topple explosion.
Keep labels simple and consistent. Think black-and-white, or a minimalist font. Your future self will thank you when you’re rummaging mid-recipe.
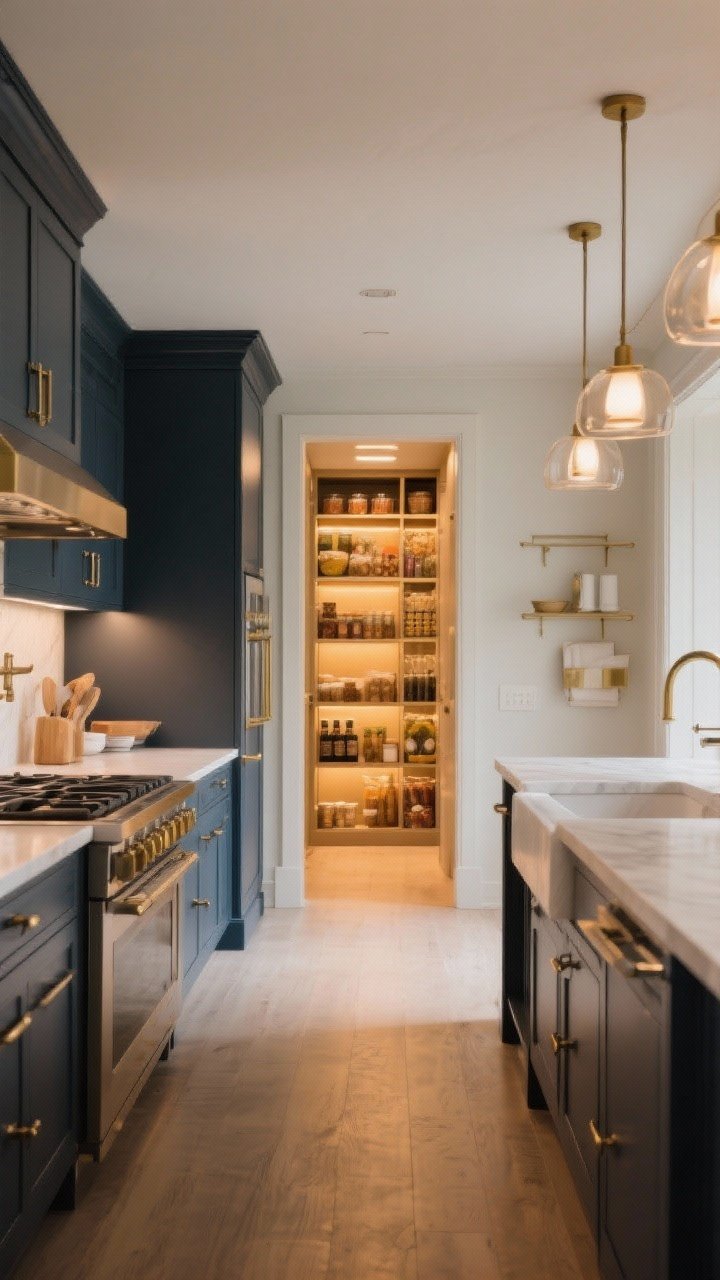
3. Add Lighting That Makes Everything Look Luxe
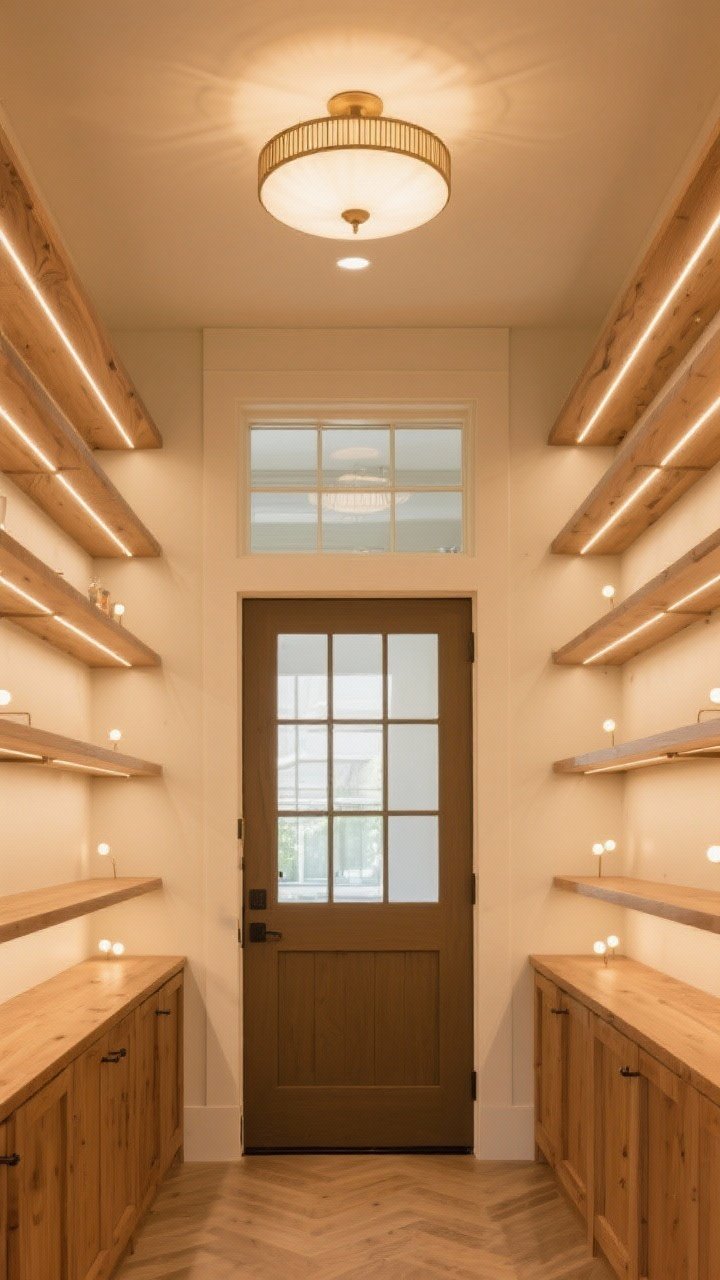
Great lighting makes your pantry feel less like a utility closet and more like a boutique. Start with a bright overhead fixture, then add LED strips or puck lights under shelves so nothing hides in shadow.
Lighting Ideas That Work
- Motion-sensor lights: Because you’re always carrying something in and out.
- Warm LEDs: Cozier and kinder to your eyes than icy cool tones.
- Glass doors or transom windows: If you can add a little natural light, do it.
Want drama? Swap in a stylish semi-flush ceiling light or mini pendant. Functional doesn’t have to mean boring.
4. Style a Statement Door (Small Change, Big Impact)
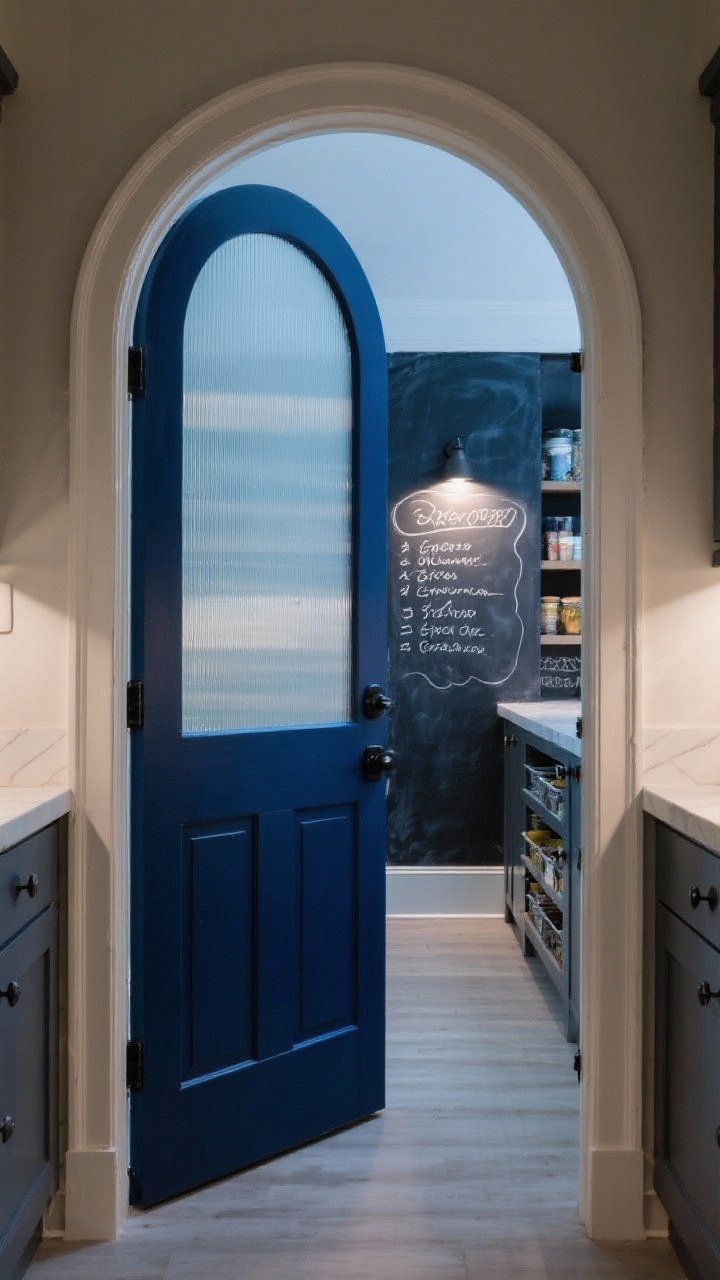
Your pantry door is front and center—give it a moment. A sliding barn door, a glass panel door, or a chic arched doorway instantly elevates the whole kitchen. If you’re not changing the door, paint it a bold color.
Door Details That Matter
- Frosted glass: Lets in light but hides the occasional chaos (we’re all human).
- Chalkboard paint: Perfect for grocery lists and family notes.
- Matte black or brass hardware: Small but mighty for that designer finish.
Pro tip: If space is tight, pocket or sliding doors beat swing doors. No elbow bruises while juggling groceries.
5. Create Zones Like a Grocery Store
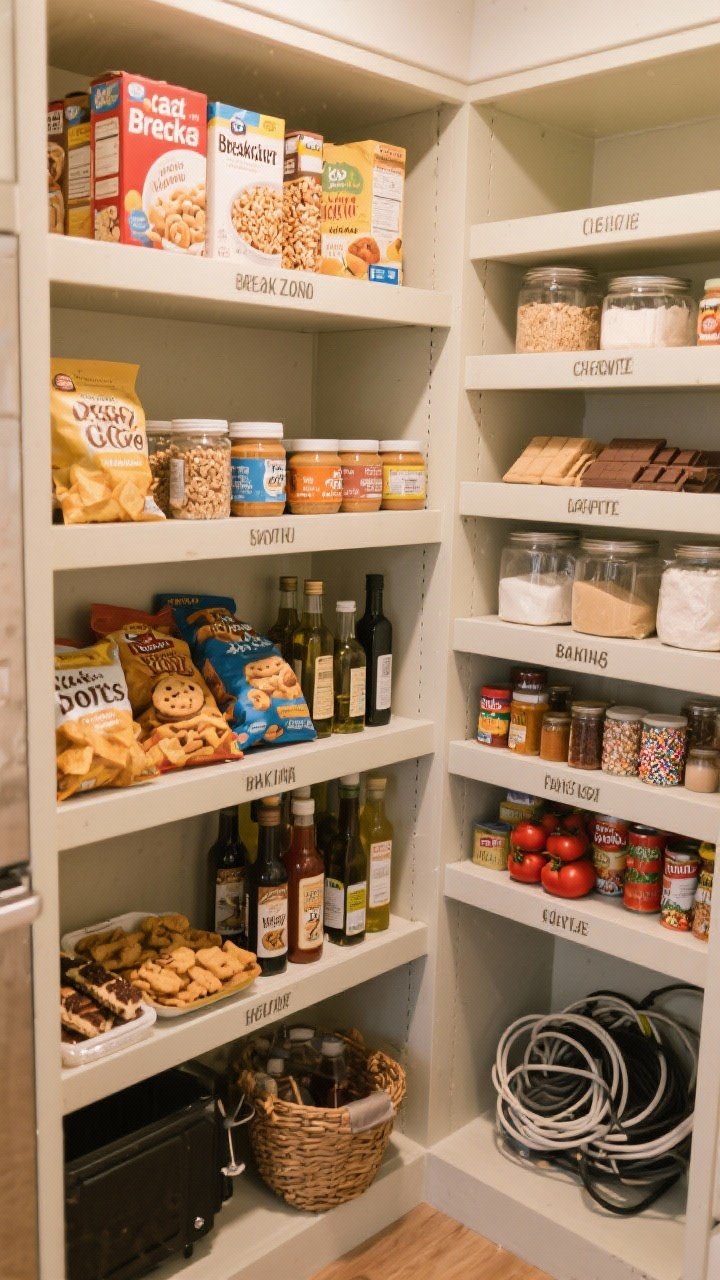
Think like a merchandiser. Group items by category and frequency so everything is easy to find—and easy to put back. This setup also helps other people in your home know where things go, so you’re not the sole Keeper of the Snacks.
Zone Ideas
- Breakfast zone: Cereal, oatmeal, granola, nut butters, spreads.
- Snack zone: Chips, cookies, bars—at eye level if you want easy access.
- Baking zone: Flours, sugars, chocolate, baking powder, sprinkles. Obviously.
- Savory essentials: Oils, vinegars, spices, broths, canned tomatoes.
- Appliance parking: Blender, mixer, air fryer—corral cords in baskets.
Use shelf dividers to keep things in their lanes. Otherwise, granola will slowly ooze into the pasta world. It happens.
6. Give Appliances a Hidden Home
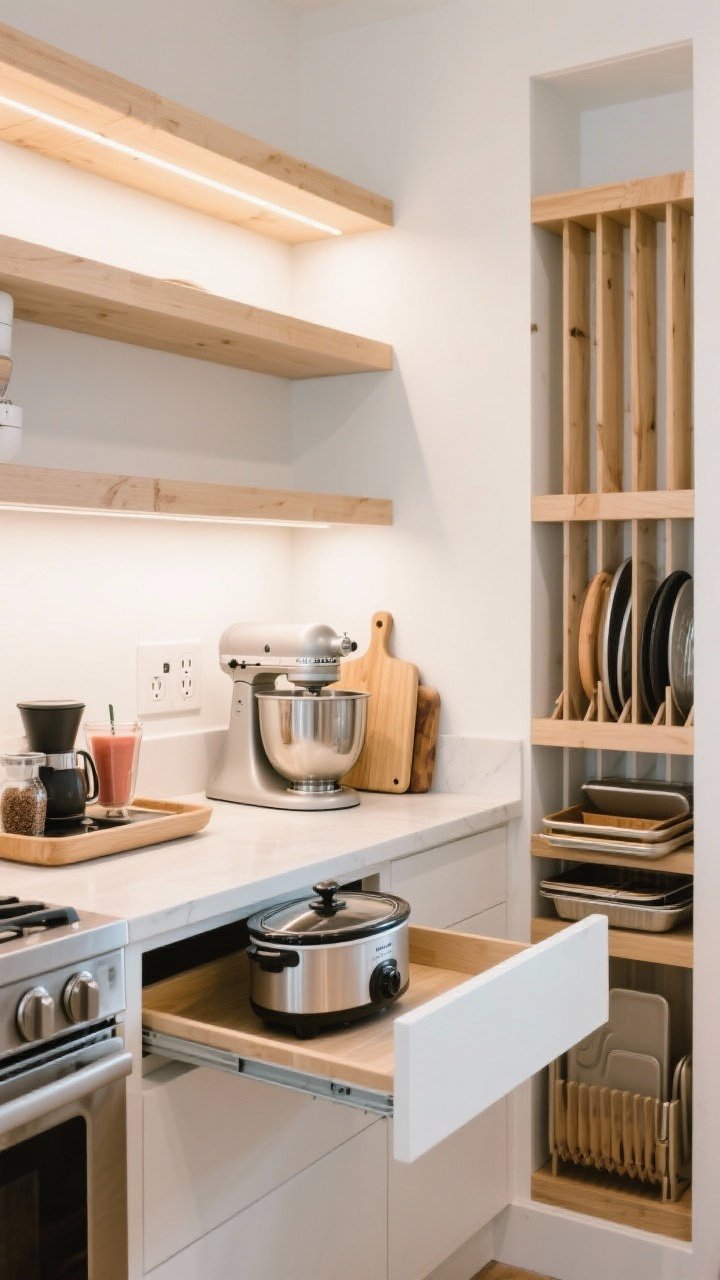
Countertop clutter? Hard pass. Build a zone for small appliances in your pantry so your kitchen stays clean and calm. Add outlets inside if you can so you can use the toaster or blender right there.
Appliance Nook Ideas
- Slide-out shelves for heavy gear like stand mixers and slow cookers.
- Pull-out trays for coffee setups or smoothie stations.
- Vertical dividers for cutting boards, sheet pans, and trays.
Bonus points for a small counter under a shelf—instant staging zone without eating kitchen space.
7. Make Use of Corners and Dead Space

Pantry corners are where boxes go to disappear forever. Don’t let that happen. Use corner carousels, L-shaped adjustable shelves, or angled shelves to get every inch working.
Dead Space Fixes
- Over-the-door racks: Ideal for spices, foil, wraps, and backups of your favorites.
- Toe-kick drawers: Slim slide-outs for baking sheets or reusable bags.
- Back-of-shelf risers: So canned goods don’t create a shady back row.
Even a 4-inch sliver can fit a vertical pull-out. That’s where you stash oils or vinegars, like a little pantry secret.
8. Build a Beverage and Entertaining Zone
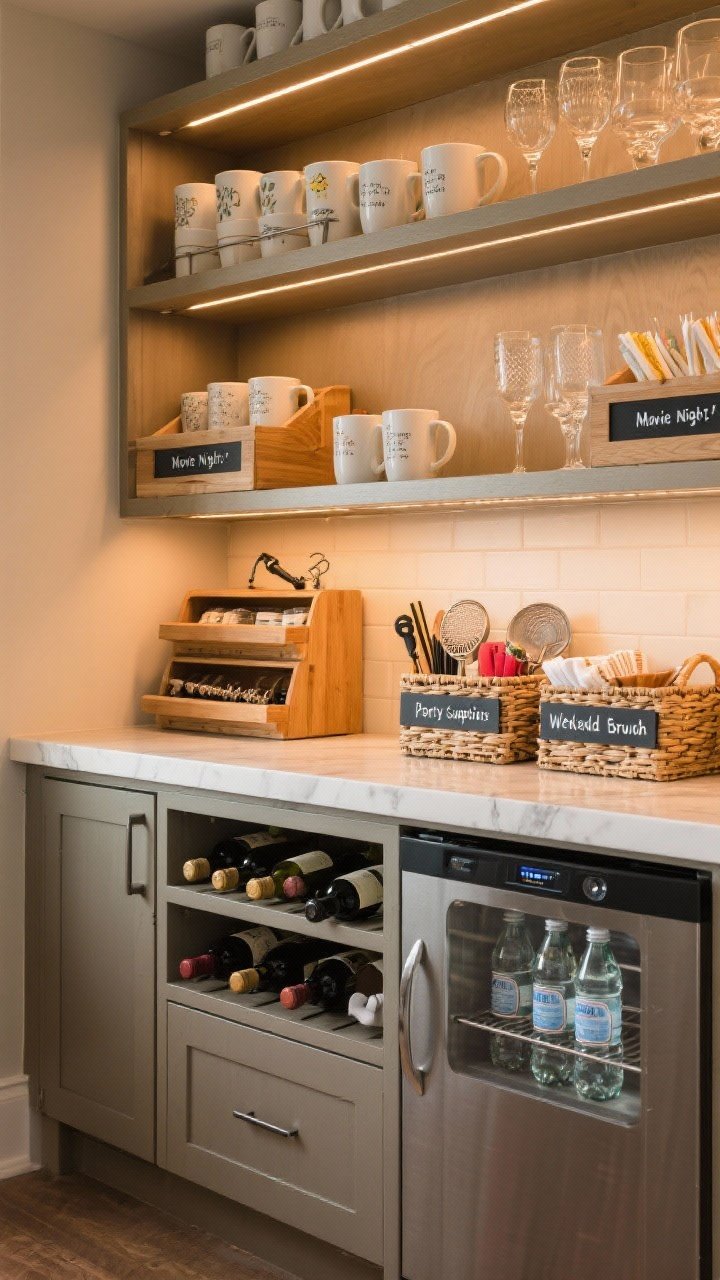
Hosting is easier when everything lives in one place. Design a beverage station for coffee, tea, syrups, glassware, and bar tools. If you’ve got room, add a mini fridge for sparkling water or cocktail mixers.
What to Include
- Open shelves for pretty glassware or mugs—function and decor in one.
- Drawer organizers for corkscrews, stirrers, strainers, and napkins.
- Wine or bottle racks integrated into lower cabinetry.
Label baskets by occasion—“Movie Night,” “Party Supplies,” “Weekend Brunch.” It’s oddly satisfying and wildly helpful.
9. Mix Open Shelves With Drawers and Bins
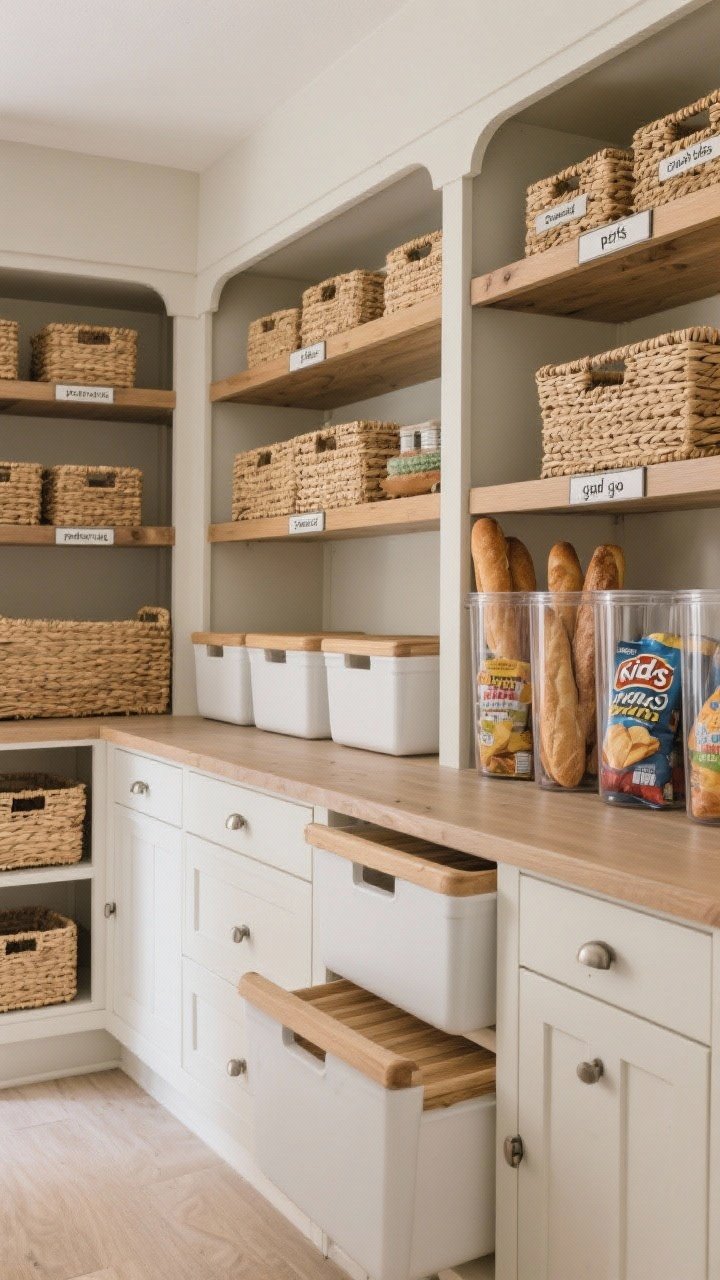
Not everything deserves to be on display. Mix open shelving with closed drawers and lidded bins to keep visual clutter at bay. Use deeper drawer storage for snacks and packets so nothing falls through the cracks—literally.
Storage Mix That Works
- Wicker or seagrass baskets for texture and warmth (and hiding chaos).
- Clear bins for categories like “kids snacks,” “pets,” or “grab & go.”
- Tall bins for chip bags and bread—keeps things upright and un-smooshed.
Label the shelf edge, not just the bin. When bins rotate or get reused, you won’t lose your system.
10. Add Style: Wallpaper, Paint, and Pretty Hardware
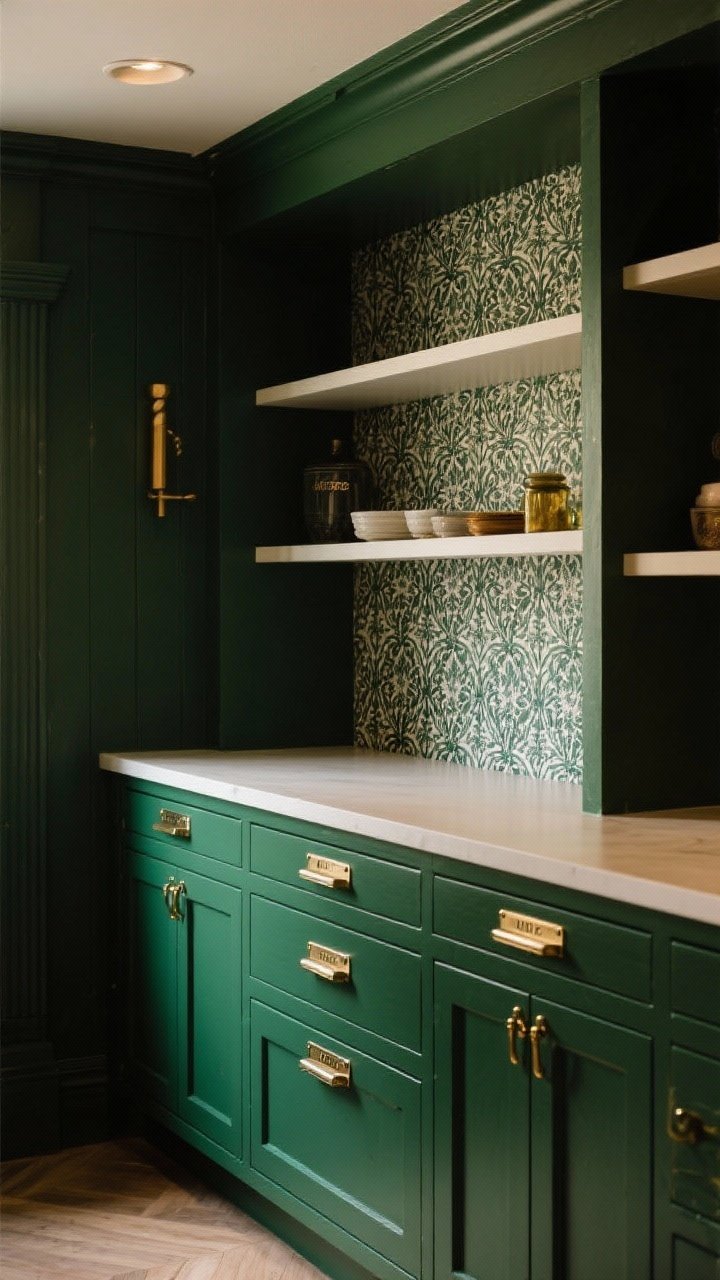
Just because it’s a pantry doesn’t mean it has to be boring. A quick dose of patterned wallpaper, a bold paint color, or contrasting shelf edges turns it into a jewel box. Treat it like a tiny design playground.
Design Moves With Big Payoff
- Rich, moody paint like deep green or navy for cozy, boutique vibes.
- Light, bright tones if the space is small or windowless—think soft white or butter cream.
- Metallic labels or brass hardware for a touch of glam without the maintenance.
IMO, this is where you can go a bit bold. You’re not staring at it all day, but every peek is a dopamine hit.
11. Make It Kid- and Guest-Friendly
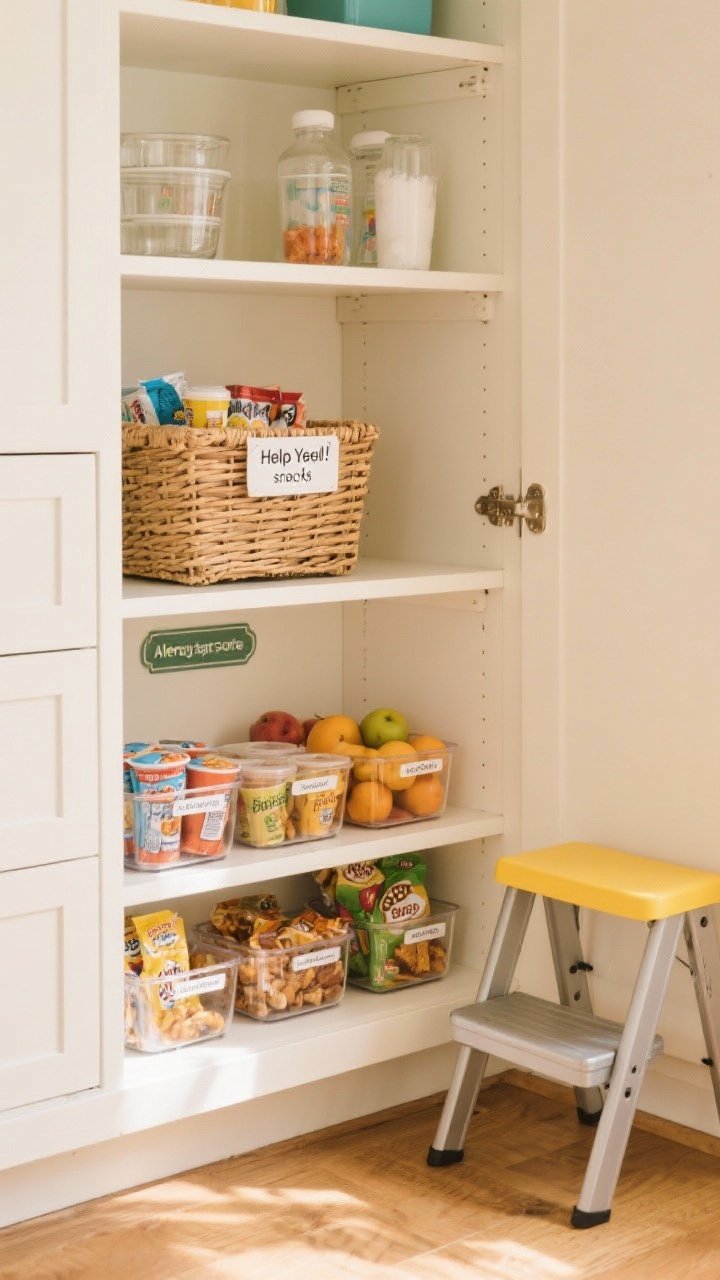
Design your pantry so everyone can help themselves. A kid-level snack shelf turns “I’m hungry” into independence. For guests, clearly labeled baskets and a visible snack zone keep them from asking where you hide the good chips.
Easy Access Ideas
- Clear bins with single-serve packs and fruit cups at child height.
- Open basket labeled “Help Yourself” for snacks or drinks.
- Allergy-safe zone if needed—clearly labeled and separate.
Keep step stools handy (foldable ones are perfect) so little helpers can reach within reason. Supervision still required for sprinkles, obviously.
12. Keep It Running With a Simple Maintenance System
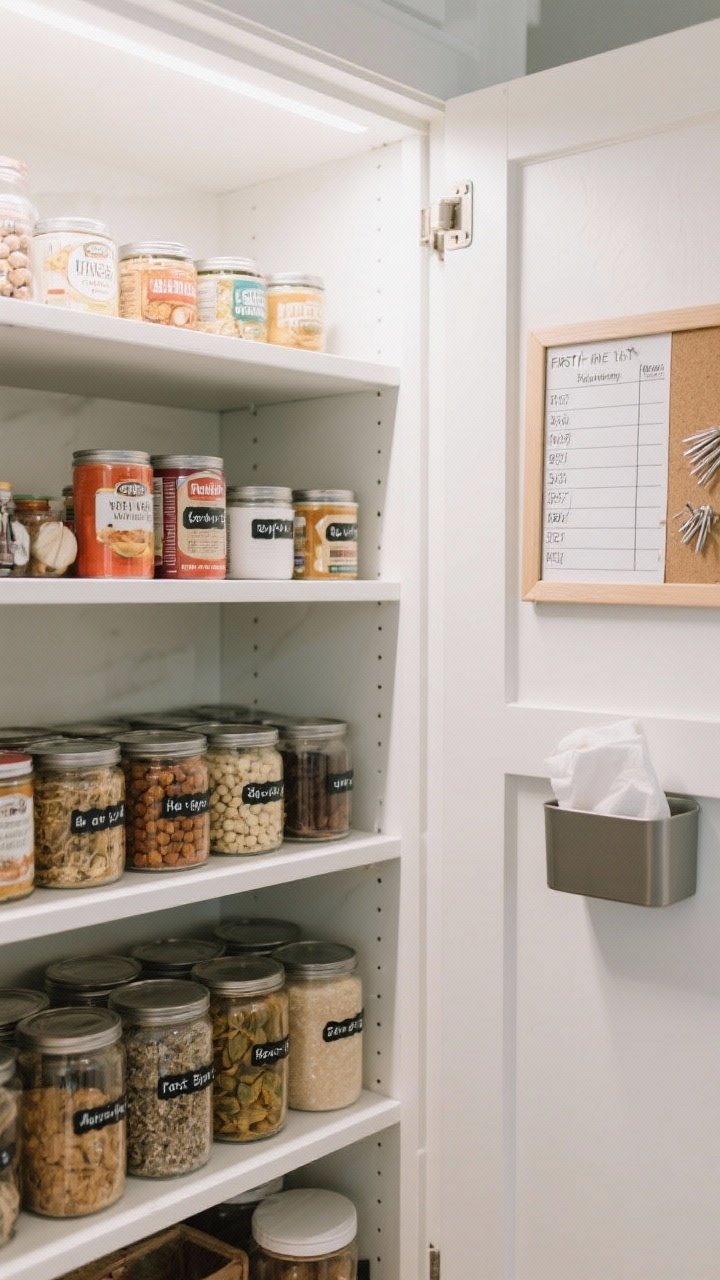
A dreamy pantry only stays dreamy if you can maintain it without a six-hour reset. Build in a low-effort system that takes five minutes a week. Yes, five.
Maintenance Habits That Stick
- First in, first out: Put newer items behind older ones to reduce waste.
- Weekly 5-minute tidy: Toss empties, return strays to their zones, wipe a shelf if needed.
- Running list: Keep a magnetic or app-based inventory for staples you’re low on.
- Quarterly edit: Donate sealed extras, decant refills, refresh labels.
Small steps keep it functional and gorgeous. No shame, no chaos, no “why do I have six kinds of quinoa?” moments—unless that’s your thing.
Final Thoughts
Your pantry can be more than a storage closet—it can be a daily luxury. With smart zones, great lighting, and a few design moments, it’ll look amazing and work even better. Start with one idea you love, tackle it this weekend, and watch the rest fall into place. You’ve got this—and your snacks are about to look fabulous.